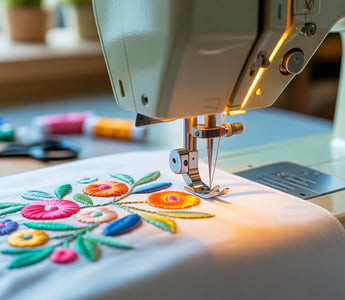
Embroidery no longer needs to be a slow, hand-stitched process. With a sewing machine, you can create custom designs, add detail to clothing, and give your home décor a personal touch—without investing in a special embroidery machine.
You can embroider with a regular sewing machine by using the right tools, stitches, and setup.
You’ll start by learning the basic supplies and settings that make the process smooth. Once your machine is ready, you’ll explore the simple stitching methods that bring designs to life.
You’ll see how easy it is to move from basic outlines to eye-catching patterns that look handmade. As you grow more confident, you can customize your own designs and experiment with textures, letters, and motifs that reflect your style.
Essential Tools and Materials for Machine Embroidery

Good machine embroidery depends on using the right tools and materials. Your results improve when your setup works smoothly—from the machine and needles to stabilizers, hoops, and key accessories that keep each stitch neat and secure.
Selecting the Right Sewing Machine
A machine with an embroidery foot or darning foot, adjustable speed, and automatic threading makes embroidery simpler. Look for a model that allows you to drop or lower the feed dogs—this gives you full control when guiding the fabric.
An embroidery-ready machine often includes built-in stitch patterns and USB transfer options for digital designs. If you’re using a regular sewing machine, free-motion embroidery is possible, but it takes more practice since you manually move the fabric to "draw" with the thread.
Check the throat space (area to the right of the needle) to ensure it fits larger projects. For stability, a sturdy table or extension arm helps keep fabric even while stitching.
Choosing Needles and Threads
Embroidery looks cleaner when your needle size and thread weight match your fabric type. Use embroidery needles that have larger eyes than standard sewing needles; this reduces friction and thread breakage.
For general use, sizes 75/11 or 80/12 work well. Heavier fabrics may need larger needles.
The table below shows basic pairings:
|
Fabric Type |
Needle Size |
Recommended Thread |
|
Light cottons |
75/11 |
40 wt rayon or polyester |
|
Denim or canvas |
90/14 |
30 wt cotton or polyester |
|
Knits |
80/12 |
Stretch or polyester embroidery thread |
Embroidery thread—usually rayon or polyester—adds shine and strength. Cotton threads give a softer, matte look for a classic finish.
Always wind bobbins evenly and keep thread tension balanced to avoid looping or puckering.
Types of Stabilizers and Hoops
A stabilizer keeps fabric from shifting. Your choice depends on the material and design density.
- Tear-away stabilizer suits firm fabrics like cotton or denim. It rips off cleanly after stitching.
- Cut-away stabilizer stays in place for stretch fabrics or detailed designs.
- Water-soluble stabilizer disappears with water and works best for lace or delicate projects.
Use an embroidery hoop or magnetic hoop to secure the fabric. Always hoop smoothly without wrinkles to get crisp outlines.
Gathering Key Accessories
The right accessories help keep your setup organized and efficient. Thread cutters speed up trimming between color changes.
Temporary adhesive spray secures fabric and stabilizer layers when hooping small or tricky pieces.
Small tools like embroidery scissors, extra bobbins, and fabric markers save time during projects. Keep a spare embroidery foot and a variety of needle sizes in your kit.
Store threads in a dry area away from sunlight to prevent fading. A small tool caddy or sewing box keeps everything within reach so you can focus on the creative part—stitching clean, detailed designs.
Setting Up Your Sewing Machine for Embroidery

Good embroidery begins with a well-prepared sewing machine. The setup process includes selecting the right needle and thread, adjusting tension settings, and securing your fabric so the stitches stay precise.
A few careful adjustments help prevent skipped stitches and uneven designs.
Preparing Your Machine
Start by attaching any embroidery-specific attachments, like an embroidery or darning foot. This foot allows the needle to move freely while you guide the fabric.
If your machine has an embroidery unit, attach it following your manual. Next, lower or cover the feed dogs to let the fabric move smoothly under your control.
This step is key for free-motion embroidery. Check that your bobbin is clean and wound evenly.
A poorly wound bobbin can cause thread tangles or uneven stitching. Use a size 75/11 embroidery needle, or another fine, sharp needle designed for embroidery.
Pair it with high-quality embroidery thread suitable for your chosen fabric type. These small details reduce thread breakage and help your design come out clean.
Adjusting Tension and Stitch Settings
Proper tension keeps stitches balanced between the top and bottom threads. Set thread tension slightly lower than you’d use for regular sewing, often between 2 and 4 on many machines.
For bobbin tension, avoid overtightening—it should allow the bobbin case to drop slowly when held by the thread. Use a short stitch length, around 1.5–2.0 mm, for detailed areas.
Slightly longer stitches work better for outlines or fills. Test different settings on a fabric scrap before starting your main piece.
This step helps prevent skipped stitches and puckering. Some machines let you fine-tune fabric tension by adjusting presser foot pressure.
Loosening it lightly reduces drag and helps the fabric glide evenly under the needle.
Proper Hooping Techniques
Hooping holds your fabric flat and steady so your stitches stay aligned. Place the fabric and stabilizer in the embroidery hoop with moderate tension—not stretched tight or loose.
The surface should feel smooth but not distorted. Use the right stabilizer type—tear-away for woven fabric or cut-away for stretchy fabric.
Layering it correctly under the fabric prevents shifts as you sew. Check alignment by lowering the needle once before starting to make sure your design starts where you planned.
Rethread, rehoop, or adjust fabric placement if you notice uneven tension or slipping during your first test stitches.
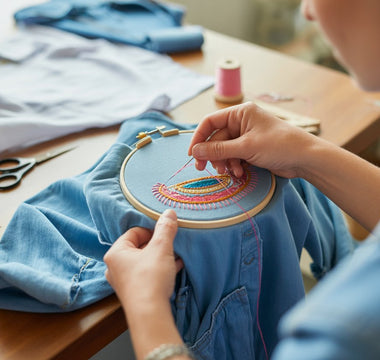
Embroidery Techniques and Stitching Methods

Machine embroidery combines precision and creativity. You control the fabric’s movement, choose stitches that define your design’s style, and adjust techniques to suit different fabric types.
Free-Motion Embroidery Basics
Free-motion embroidery lets you draw with thread using your sewing machine. You lower or cover the feed dogs, attach a darning or embroidery foot, and move the fabric yourself.
This gives you full control over the stitch direction and shape. Use a medium speed so you can guide the fabric smoothly without jerking.
A key tip is to keep your stitching arm relaxed. Sudden moves can create uneven stitches or puckering.
Start by outlining simple shapes before adding details.
Here’s a quick setup checklist:
|
Step |
Task |
Note |
|
1 |
Lower feed dogs |
Prevents automatic fabric movement |
|
2 |
Install embroidery foot |
Allows full fabric control |
|
3 |
Use stabilizer under fabric |
Reduces stretching and puckering |
|
4 |
Adjust stitch length manually |
Set machine to straight stitch mode |
This technique works well for freehand lettering, floral outlines, and abstract embroidery projects that require creative freedom.
Common Stitches Used in Machine Embroidery
Several stitch types add texture and depth to your designs. The basic straight stitch is perfect for outlines or delicate details.
The zigzag stitch creates a flexible, decorative line that works for borders or filling small areas. A satin stitch forms a smooth, solid block of color, ideal for letters and dense motifs.
The running stitch gives a light, dashed effect, often used for sketch-style embroidery. In contrast, the backstitch strengthens lines where you want extra definition.
Use this quick reference:
- Straight stitch: Outlines and detail work
- Satin stitch: Areas needing full coverage
- Zigzag stitch: Edge finishing or curved lines
- Running stitch: Lightweight patterns
- Backstitch: Reinforced lines
Experiment with thread weight and tension to find crisp, even stitches that match your embroidery designs.
Also read: Types of Embroidery Stitches: 15 Must-Know Basics & Beyond
Working with Different Fabrics
Different fabrics behave in unique ways under a sewing machine. Lightweight fabrics like cotton or linen need a stabilizer to avoid distortion.
Stretchy fabrics such as jersey require extra support to keep the material from pulling out of shape. Use the right needle type and size.
For example, use a ballpoint needle on knits and a sharp needle on woven fabrics. Adjust your tension and presser-foot pressure to keep stitches even across varying fabric thicknesses.
When working on delicate or complex fabric types, always test your stitches on scraps first. This small step prevents issues before starting your final embroidery project.
Creative Design and Advanced Machine Embroidery

Turning your ideas into embroidered art involves planning, pattern transfer, and digital precision.
With the right tools and methods, you can design original pieces, enhance texture, and add unique flair to any fabric.
Transferring and Creating Embroidery Patterns
Before you start stitching, prepare your design carefully. You can draw directly on the fabric using water-soluble pens, allowing you to rinse away markings later.
Another option is carbon transfer paper, which helps move intricate embroidery patterns from paper to cloth with clean, visible lines. When designing your pattern, consider size, fabric type, and stitch density.
Small, detailed images work best on tightly woven fabrics, while bold designs look better on coarser materials.
Create a simple outline first, then add details gradually to maintain balance and clarity in your embroidered designs.
Keep a small notebook of pattern sketches and color combinations. This makes it easier to recreate or adjust a design later.
Whether you start from a printed pattern or draw freehand, taking time to transfer your layout accurately ensures smoother stitching and fewer mistakes.
Using Embroidery Software and Digitizing
Modern embroidery software gives you flexibility beyond hand drawing.
With digitizing software, you can convert images, text, or hand-drawn sketches into stitch-ready files that your embroidery machine can read.
You can adjust stitch types, direction, and thread colors to fine-tune the look.
When using software, pay attention to resolution and sizing. A low-quality image can result in uneven stitches or gaps.
Always preview your design in the program’s simulator before sending it to the machine. This step helps you spot and fix errors early.
Some programs allow you to add layers, mix fonts, and preview thread combinations from major brands.
Use this feature to test color harmony before starting the embroidery project. Keep your designs organized in folders with clear labels for easy reuse or modification.
Exploring Advanced Techniques and Embellishments
Once you’re comfortable with basic machine embroidery, you can try advanced embroidery techniques to add depth and dimension.
Methods like appliqué, 3D embroidery, and freestanding lace introduce texture and layering effects that stand out on finished pieces.
Experiment with specialty threads such as metallic or variegated options for subtle highlights.
Use decorative stitches or bead embellishments to enhance visual interest.
Always test new materials on practice fabric first to adjust tension and stitch settings for your embroidery machine.
For creative variation, mix fabrics like felt or organza within one piece.
Combine stitched elements with embroidery designs made digitally for complex, multi-layered results.
Also read: Flower Embroidery Patterns: Tips, Ideas, and How-To Guide
Wrap Up
Embroidery with a sewing machine is a fun way to create detailed designs quickly. Use free-motion embroidery or an embroidery machine for precise patterns.
Choose the right stabilizer and fabric to avoid puckering, and practice guiding the fabric smoothly. With patience, you can embellish shirts, denim, and more with beautiful stitched designs.
Ready to start machine embroidery? Check out Caydo collections for inspiring designs and elevate your sewing projects with ease!
Frequently Asked Questions
What type of stabilizer is best for machine embroidery?
Choose your stabilizer based on fabric type and design detail. Tear-away stabilizers work well on firmly woven fabrics like cotton.
Cut-away stabilizers support stretchy or delicate fabrics such as knits. Use wash-away stabilizers for light fabrics or projects where you don’t want leftover backing.
Always make sure your stabilizer fully covers the embroidery area.
Can I use regular sewing thread for machine embroidery, or do I need special embroidery thread?
Use embroidery thread for the best results. It’s made to handle higher speeds and adds a soft sheen to your stitch work.
Regular sewing thread can work for testing, but it may break more often and appear dull.
Polyester or rayon embroidery threads are most common because they combine strength with smooth texture.
How do I select the right needle for machine embroidery on different fabrics?
Match your needle size and type to both the fabric and thread. A standard embroidery needle (size 75/11 or 80/12) fits most projects and has a larger eye that reduces thread friction.
For fine fabrics, use a smaller needle to avoid snags. Heavier fabrics, such as denim or canvas, need a stronger needle like a 90/14.
What are the steps to threading my sewing machine for embroidery work?
Follow your machine’s threading path carefully, paying attention to each thread guide and tension area. Always raise the presser foot before threading so the tension discs stay open.
Use the top thread and bobbin thread designed for embroidery. Double-check that both are seated properly before starting your first stitch.
How can I transfer my embroidery design onto the fabric using a sewing machine?
If your machine connects to a computer or USB, load the design file directly into its memory. For regular sewing machines, mark the pattern on your fabric using washable fabric pens or transfer paper.
Use an embroidery hoop to keep the fabric stable along the marked design lines as you stitch. Go slowly to stay on track with the pattern.
Are there any tricks to ensuring my fabric doesn't pucker or shift while I'm embroidering with my machine?
Use the right stabilizer and test your tension settings before committing to the final fabric. Hoop both the fabric and stabilizer snugly, but don’t overstretch.
Keep your fabric smooth and flat as you embroider. Practicing on similar scrap fabric helps you find the right mix of tension, stitch speed, and hoop pressure.


