When you first start diamond painting, it’s easy to feel excited and overwhelmed at the same time.
The sparkle, the patterns, and the endless choices pull you in fast—but it’s the small details that make or break your experience.
You’ll learn how to pick the right tools, organize your materials, and set up a workspace that keeps you motivated instead of stressed.
Simple habits, like labeling drills or choosing the correct canvas size, help your projects look cleaner and take less effort to finish.
Understanding The Basics Of Diamond Painting

Diamond painting mixes the relaxation of cross-stitch with the sparkle of mosaic art. You place tiny resin “diamonds” on a coded canvas, creating images that shine under light.
Knowing how it works, how to read the chart, and what steps you’ll take from start to finish helps you enjoy the process instead of feeling lost.
What Diamond Painting Involves
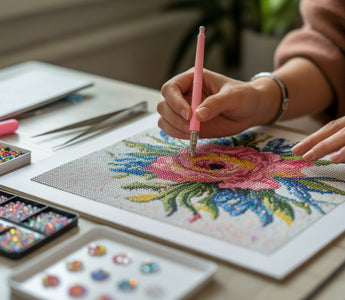
Diamond painting uses a printed canvas, colored resin drills, a stylus pen, tray, and wax pad. You press each small diamond onto sticky areas on the canvas that match the symbol in that grid square.
Canvases come in round or square drills. Round drills are quicker to place and often better for beginners because they don’t need perfect alignment. Square drills fit tightly together and give a smooth, detailed look.
Pay attention to the legend on the side—it lists every symbol, color code (usually a DMC number), and diamond bag number.
Keep your tools organized. Use small containers or bags with labels to track similar shades.
Many crafters find that grouping colors in number order speeds up projects and keeps the workspace neater.
Reading The Pattern And Legend Carefully
Before starting, study the pattern like a map. The canvas has a grid of symbols, each symbol standing for a specific bead color. The legend, or chart, is your key to decoding it.
Here’s a simple example:
|
Symbol |
Color Code |
Drill Color |
|
★ |
310 |
Black |
|
□ |
742 |
Bright Orange |
|
△ |
907 |
Lime Green |
Check that each bag’s code matches what’s printed in the legend before applying any drills. A simple mistake here can ruin part of the image.
Use a highlighter to mark off finished areas on printed legends. For larger designs, section the peel-off plastic cover with masking tape so you only work on small squares at a time.
Staying organized saves time and avoids color mix-ups.
Knowing The Process Upfront
Understand the workflow before you begin so you can set up your space and time wisely. You’ll start by flattening the canvas, sorting drills, and preparing tools.
Use the stylus with a dab of wax to pick up each bead and place it on the adhesive surface.Work from the top corner downward if you’re right-handed, or the opposite side if you’re left-handed, so your arm doesn’t stick to the glue.
When you finish a section, press lightly with a roller or book to secure the drills. Diamond painting, sometimes called paint with diamonds or diamond art, isn’t fast—it’s steady.
Plan breaks, store your canvas flat, and cover it again to keep dust off.
Choosing The Right Tools Makes A Difference

The tools you use shape how smoothly your diamond painting projects go and how your finished piece looks. A few smart choices can make your workspace more comfortable and your results more precise.
Investing In Quality Tools
High-quality tools help you place diamonds with better accuracy and less frustration. A reliable diamond applicator tool, for example, picks up and releases drills cleanly without dropping them or leaving residue.
Low-cost versions often lose grip or bend, which slows you down. You should also look for a light pad that evenly brightens your canvas.
Good light helps you see symbols clearly and prevents eye strain. A sturdy storage organizer keeps drills sorted by color, saving time when swapping between shades.
|
Tool |
Why It Matters |
|
Light pad |
Improves visibility and reduces errors |
|
Diamond applicator |
Increases speed and precision |
|
Storage box |
Keeps drills organized and easy to reach |
A small upfront investment in durable tools means you’ll replace items less often and spend more time doing what you enjoy—painting with ease.
Benefits Of Ergonomic Diamond Pens
Ergonomic diamond pens reduce strain on your fingers and wrists, especially during long sessions. Unlike thin plastic pens, padded handles or soft grips support your hand’s natural shape. This design encourages a relaxed hold and steadier placement.
If you often work on large canvases, a multi-diamond applicator can help. It lets you pick up several drills at once, covering rows faster without heavy pressure on your fingers.
Many crafters find switching between single and multi-placers gives them flexibility for detailed and large areas alike.
Choosing pens with adjustable tips or replaceable heads adds more value. You can adapt the pen to your style instead of forcing your hand to fit the tool.
How The Right Tools Improve The Process
Having proper tools streamlines setup, helps you stay organized, and leads to more consistent results. Using a wax pad that fits your applicator ensures each drill sticks correctly.
Tweezers help you fix misplaced diamonds without tearing the canvas. A quality light pad paired with clear labeling speeds up color matching.
Strong wax and straight, firm applicators mean fewer mistakes and less cleanup later. You’ll spend less time fixing misaligned rows and more time watching your design come together.
Also read: 10 Personalized Diamond Painting Ideas for Adults
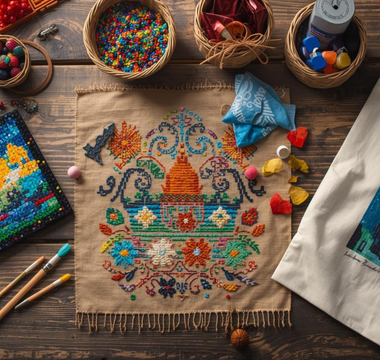
Organizing Your Diamonds Is Key

Keeping your diamonds neat saves time, prevents frustration, and protects your project. With so many colors, shapes, and sizes, a little planning makes the whole process smoother and more enjoyable.
Proper organization also helps you spot missing drills before starting a new area.
Managing Multiple Colors And Drills
You’ll work with dozens of shades, and some can look nearly identical. Start by separating round drills and square drills, since they have different shapes and fit differently on the canvas.
Round ones are easier to place but can roll away, while square ones click neatly together for a cleaner finish. Use small containers or resealable bags to keep colors sorted.
Craft stores sell storage boxes with compartments that fit labeled vials, which are great for larger projects.
A color chart or printed key taped to the lid helps you remember where each shade belongs. When working on several paintings, label each set of diamonds with the project name to avoid mixing them up.
Keep a small tray or boat nearby for your active colors. Return extra drills to their container before switching to a new shade to prevent cross-contamination.
Sorting And Labeling Diamonds
Sorting and labeling diamonds right after unboxing saves hours later. Group drills by DMC number, color, and size.
Many crafters prefer using small jars or zip bags, arranged either by number order or shade family. Create clear, easy-to-read labels. Include the color number, symbol from the canvas, and whether they are square or round. Permanently mark or use pre-printed stickers for best results.
If you use round containers, line them in a drawer or a shallow tray for quick access.
For bag systems, store them upright in a small bin or box. You can make a simple reference chart to show where each bag or jar sits, making cleanup faster.
Preventing Mistakes And Lost Diamonds
Losing drills is common but easy to prevent. Always keep a tray mat or lint roller nearby to catch stray diamonds.
Avoid opening too many containers at once, especially when dealing with close color matches. Seal containers tightly after every session. Some crafters add a small piece of tape over the lid for extra protection. Keep your workspace dry and flat to prevent static from making drills stick to tools or jump from trays.
For large projects, store unused diamonds in a labeled box with a lid. Maintain a small spare drill jar for loose extras—sorted by round or square shape—so you’ll have backups if a few go missing later.
Setting Up A Comfortable Workspace

A well-planned workspace keeps your diamond painting experience comfortable and efficient. By focusing on lighting, posture, and workspace protection, you can enjoy longer sessions without feeling strain or frustration.
Importance Of Good Lighting
Proper lighting helps you see the tiny resin drills clearly and match each color to the correct symbol. A bright, even light minimizes eye strain and prevents mistakes, especially when working at night or in low-light rooms.
Use a light pad under your canvas to illuminate symbols from below. Many crafters find this tool useful for working with dark or multi-colored backgrounds.
Choose a light pad with adjustable brightness so you can set it to a comfortable level that won’t cause glare. You can also add an LED desk lamp with a flexible neck. Position it to reduce shadows over your workspace.
Natural daylight bulbs with a cool-white tone provide a clear, neutral color that helps your eyes pick up fine differences in shades.
If you have limited space, clip-on lamps or portable ring lights can work just as well. The goal is soft, even illumination that keeps your focus sharp without straining your eyes.
Creating An Ergonomic, Clutter-Free Space
An ergonomic setup keeps your body comfortable while you work. A sturdy, flat table at the right height makes a big difference. Your forearms should rest comfortably at table level. Your shoulders should feel relaxed.
Consider an adjustable chair with back support. Add a cushion for better posture. Keep the area around your project free of clutter. Store drills, trays, and tools in small drawer organizers or labeled containers.
Vertical shelving or a rolling cart helps save surface space. This keeps supplies close at hand.
For smaller homes or apartments, foldable or portable tables are useful. You can set up anywhere and put everything away afterward.
Using Mats Or Rollers
A non-slip mat under your canvas keeps it stable while you work. It prevents the canvas from sliding and protects your table from any adhesive residue.
Mats with a smooth, wipeable surface are simple to clean and maintain. To smooth air bubbles or wrinkles, use a diamond painting roller.
Gently roll it across the canvas to press drills firmly into the adhesive. Avoid pressing too hard, as it may shift drills or damage the backing.
Many crafters use craft mats with measurement grids. These give you a visual guide for aligning your canvas and trimming edges.
Patience And Time Management Are Essential

Diamond painting takes steady focus and planning. You need to manage your time so you can enjoy the process instead of feeling rushed. Working carefully and staying patient helps every section line up neatly and sparkle evenly.
Diamond Painting Is Time-Consuming
Even a small diamond painting can take many hours to complete. Each tiny gem, or “drill,” must be placed by hand, which means progress happens slowly.
Many new painters underestimate just how long a design will take, especially larger or detailed ones. This craft is meant to be relaxing, not fast.
When you give yourself enough time, you can focus on neat placement and color accuracy. Try marking your progress so you stay motivated—track how long it takes to finish small sections or count the drills placed per session.
- Choose canvas sizes that fit your schedule.
- Set small daily goals instead of long marathon sessions.
- Keep tools organized so you waste less time searching for materials.
Breaking Projects Into Manageable Sessions
Splitting your project into short sessions helps you stay consistent and avoid fatigue. Working for hours without a break can make your eyes tired and your hands sore.
Plan 30–60 minute sessions and celebrate completing specific areas, like a color block or section grid. Many crafters cover their canvas with protective film sections or use washi tape to divide it into squares.
This keeps dust away and gives you clear stopping points.
|
Time Available |
Suggested Session |
Notes |
|
30 minutes |
Finish one grid |
Focus on neatness |
|
1 hour |
Two grids or one small color patch |
Maintain steady rhythm |
|
Weekend |
One large section |
Plan breaks every hour |
Avoiding Rushing For Best Results
Rushing leads to crooked drills, uneven texture, and gaps that ruin the final look. Mistakes become harder to fix because adhesive areas lose stickiness over time.
Take your time pressing drills gently and aligning them straight with a roller or pen tip. If you find yourself speeding up, pause and remind yourself why you started—to relax and create something beautiful.
You can make the process calmer by keeping your workspace quiet, listening to soft music, and setting realistic goals. Avoid comparing your pace to others.
Everyone paints at a different speed, and that’s perfectly fine.
Common Mistakes And How To Fix Them

Diamond painting can get tricky when rows shift, drills pop off, or sticky surfaces lose grip. Paying attention to small details and keeping your workspace clean can make the process smoother.
Examples Of Common Errors
One frequent problem is placing diamonds on crooked rows. Even a small misalignment can stand out once the piece is finished.
To prevent this, work in small areas at a time and use a ruler or straight edge to line up tiles. Another mistake is touching the adhesive surface with your fingers.
Oils from your skin make it less sticky and harder for diamonds to stay in place. Keep the release paper over unused spots until you’re ready to work.
It’s also easy to forget edge control. Without proper borders, adhesive can attract lint or fray the canvas.
Apply washi tape along the edges to protect it. This keeps the surface neat and helps you stay within clean working boundaries.
|
Mistake |
Simple Fix |
|
Crooked rows |
Use ruler or multi-placer tool for straight lines |
|
Dirty adhesive |
Keep release paper on until ready to work |
|
Sticky edges |
Apply washi tape around canvas borders |
Removing And Repositioning Diamonds
Misplaced diamonds happen often, especially when you’re working fast. Use a tweezers tool to lift the diamond gently instead of prying it with your fingers.
Pull upward, not sideways, to avoid tearing the glue or canvas fibers. If the glue loses grip after several lifts, lightly press a new drill into place.
You can re-stick drills by adding a tiny dot of fabric glue or self-adhesive putty. Let it dry before continuing.
When you notice patterns shifting, lift only a few rows at a time instead of starting over. Press them back in line using a roller to flatten them evenly.
Using Tools To Fix Issues
Good tools make correction work faster and cleaner. A diamond painting roller smooths uneven spots and boosts adhesion without damaging drills.
Use light pressure in straight motions. A wax pen or stylus can help reattach or realign individual diamonds that don’t stick well.
Keep extra wax handy since it loses grip over time. Replace it whenever the pen stops picking up drills easily.
For larger adjustments, store small sets of tweezers, spare trays, and extra release paper. These items help you manage sticky areas, remove unwanted lint, and reposition drills precisely. Keeping tools nearby lets you solve mistakes as they happen so your finished piece stays neat and level.
Also read: What’s the Difference Between Diamond Art and Diamond Painting?
Finishing Touches And Displaying Your Artwork
Once your diamond painting is complete, you can protect it and show it off in ways that keep it looking neat and polished. Small extra steps—like sealing, framing, and proper storage—make a big difference in how well your artwork holds up and how professional it appears.
Sealing The Finished Painting
Sealing keeps your diamonds in place and helps prevent dust or moisture from dulling the sparkle. After you press the diamonds firmly into the adhesive with a roller, apply a thin, even coat of sealant.
You can use brush-on or spray sealers, but make sure it’s clear, non-yellowing, and safe for acrylics. Let the painting dry flat for at least a full day.
Once sealed, the diamonds won’t shift, and you can safely handle or frame the piece. Avoid using glues that leave a sticky finish; they can attract dust and reduce shine.
Quick Tip: Test a small corner first to check how the sealer reacts with your drills and canvas.
Framing Or Mounting Your Work
Framing gives your diamond painting a clean, finished appearance. You can use a traditional frame with glass, a stretched canvas, or a foam board mount depending on your style and budget.
Frames with mats can hide uneven edges, while open frames without glass preserve the painting’s texture and sparkle. If you choose to mount it yourself, trim the edges neatly and use double-sided tape or craft glue to secure the canvas.
Stretching it over a canvas frame works well for large or bold pieces.
|
Method |
Look |
Tools Needed |
|
Standard Frame |
Formal |
Frame, tape, scissors |
|
Canvas Stretch |
Modern |
Staple gun, stretcher bars |
|
Foam Board |
Lightweight |
Craft knife, adhesive |
Framing also protects your painting from bending or creasing if you plan to hang it without glass.
Preserving Artwork Long-Term
To keep your diamond art looking like new, store it flat or rolled gently with the drills facing out. Avoid humid areas or direct sunlight since both can weaken the adhesive and fade colors.
If you need to move or gift your painting, place a sheet of wax paper or parchment over the surface to prevent scratches. Clean occasionally with a soft, dry cloth to remove dust.
For long-term storage, use an acid-free portfolio or protective sleeve. Keep it away from extreme heat or cold.
Recommended Products To Enhance Your Diamond Painting Experience
Using the right tools makes diamond painting smoother, faster, and more comfortable. Good accessories help you place drills precisely, keep your workspace organized, and protect your finished artwork from damage.
Electric Diamond Painting Pen
An electric diamond painting pen lets you place multiple drills quickly with less strain on your wrist and fingers. It works by using a gentle vibration or motorized tip to pick up drills and place them with accuracy.
You can usually switch between single and multi-placer heads depending on the size and shape of your pattern. This tool is especially helpful for large canvases where hand fatigue can slow progress.
Most models plug into a USB port or run on batteries, making them easy to use anywhere. Look for pens that include adjustable speed settings and comfort grips so you can control both speed and accuracy.
A quality option will come with extra tips, replacement wax heads, and a charging cable. Cleaning the tip often and using fresh wax improves drill adhesion and prevents slippage.
Diamond Painting Storage Containers & Trays
Keeping drills organized avoids spills and color mix-ups. Diamond painting storage containers and sorting trays help you manage beads by color, size, or number.
Choose a container set with tight lids so drills don’t scatter if tipped over. Many crafters like boxes with clear compartments and printed labels for easy reference when switching between colors.
Stackable trays save space and let you work on several colors at once without cluttering the table. Below is a quick comparison of common container types:
|
Type |
Best For |
Key Feature |
|
Small jars |
Frequent switching |
Refillable and portable |
|
Large bins |
Bulk storage |
Holds full drill packs |
|
Stackable trays |
Active projects |
Easy color access |
Stay consistent with one labeling style so you can quickly find the right drills every time.
Diamond Painting Wooden Roller
A wooden roller helps press drills firmly into the adhesive canvas. After completing sections of your artwork, rolling gently across the surface makes sure every drill sticks evenly.
This reduces the chance of loose gems later. Wooden rollers are more durable and steady than plastic ones.
Their smooth surface helps spread pressure evenly without scratching drills. Some rollers even have ergonomic handles to improve grip.
Use a roller once each area is filled and before sealing. Keep it clean by wiping it down with a dry cloth after each session.
You’ll notice a flatter, more polished finish, especially on large diamond painting kits.
Flowers By The Window Diamond Painting Kit

The Flowers By The Window Diamond Painting Kit combines a calm floral design with a detailed background that’s enjoyable to fill in step by step. This kit usually includes a pre-printed canvas, labeled resin drills, wax pad, applicator pen, and tray—everything you need to get started right away.
The mix of soft colors and clear grid lines make it beginner-friendly while still detailed enough for experienced painters. You’ll practice color blending and learn how shading affects depth.
The sturdy canvas keeps shape over time, and drills hold a bright shine under light. If you want to strengthen your skills while creating a soothing image, this kit is a solid choice.
Wrap Up
Diamond painting is a relaxing and rewarding craft, but knowing key tips beforehand can save time and frustration. From selecting quality kits and organizing diamonds to understanding the best tools and working lighting, preparation is key.
Patience and proper workspace setup enhance enjoyment and results. Avoid common mistakes like rushing or mixing colors. Ready to start your diamond painting journey with confidence?
Explore Caydo collections for top-quality diamond painting kits and accessories to create sparkling masterpieces with ease!
Frequently Asked Questions
How do I choose the right canvas size for my diamond painting project?
Pick your canvas based on how detailed you want your design to look. Larger canvases show more detail and reduce blurriness, while smaller ones work well for simpler images.
Beginners often start with a 30x40 cm or smaller design to get used to the process without feeling overwhelmed. Make sure your space fits the canvas comfortably.
A larger canvas requires more time, workspace, and patience.
What are the best strategies for organizing and storing drills?
Use labeled containers, pillboxes, or resealable bags to keep your drills sorted by color and number. Clear containers make it easier to see each shade at a glance.
If you pause mid-project, seal open drills tightly to prevent dust or moisture from getting in. Some crafters also store trays or drills on a baking sheet or tray liner to contain spills.
Are there any must-have tools to enhance my diamond painting experience?
A light pad can help you see symbols clearly and reduce eye strain. A multi-placer pen tip lets you pick up several drills at once to speed up your work.
You might also find tweezers, roller tools, and storage boxes helpful for keeping everything neat and aligned.
What are the common mistakes to avoid when starting out with diamond painting?
Many beginners peel off the whole plastic cover at once, which can attract dust and dry out the sticky layer. Work in small sections instead.
Overhandling the adhesive area or pressing too hard can cause drills to shift or the canvas to lose its grip. Also, check drill codes carefully before placing them to avoid color mix-ups.
How can I prevent the canvas from losing its stickiness over time?
Always cover unused areas with the protective sheet when not working. This keeps out dust, pet hair, and air that can cause the canvas to dry out and lose stickiness.
If you notice reduced tackiness, gently wipe the surface with a baby wipe and let it dry before adding more drills. Avoid using oils or cleaners that could damage the adhesive.
Can you offer tips for framing and displaying my finished diamond painting artwork?
Flatten your finished painting using heavy books or a roller before framing. A glass-front frame protects it from dust while keeping the sparkle visible.
If you prefer no glass, spray a light sealant over the surface to keep the drills in place. Hang it in a dry area away from direct sunlight to prevent fading or yellowing.


