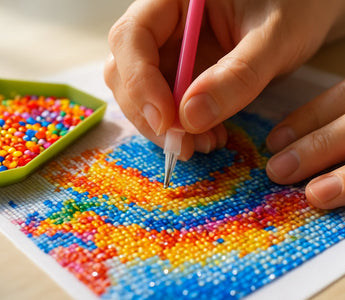
Using a diamond painting pen is easy and straightforward. First, press the pen onto the wax pad to help it pick up each diamond. Then, place the diamond onto the matching spot on the canvas according to your pattern.
Keep repeating this step, filling in the canvas with diamonds one at a time, until your entire diamond painting design is complete.
Knowing what to do if your diamond painting is not sticky is also important because a non-sticky canvas can stop your project before it starts.
You might be surprised at how tools like trays, tweezers, and multi-placer pens can make your work neater and quicker.
If you ever wonder what to do if your diamond painting is not sticky, cleaning the area and using a bit of adhesive can help restore your canvas.
Essential Diamond Art Tools And What They Do

To work on diamond art, you need a set of specific tools. Each tool serves an important function to help you place the pieces neatly, keep your diamonds organized, and make the whole process easier and more efficient.
Diamond Painting Pen And Multi-Placer Tips

Caydo Electric Diamond Painting Art Pen– Vacuum Suction & Rechargeable
A diamond painting pen is the tool you hold to pick up and place the diamond beads, sometimes called drills.
Basic pens are for single diamonds, while multi-placer tips let you place several at once, saving time. Ergonomic or weighted pens can make long sessions more comfortable.
Wax Or Glue Pads
Wax or glue pads are important for making your pen sticky enough to pick up the small diamonds. Most diamond painting kits include pink wax squares.
Press your pen tip into the wax or glue pad to make it sticky enough to pick up diamonds. Use just enough wax and replace it as needed for the best results.
Sorting Tray
Sorting trays are used to pour out small amounts of diamonds and shake them gently so that they flip with the flat side down.
Pour diamonds into the tray and shake gently so the flat side faces down. Trays help you pick up diamonds easily and pour unused beads back into storage.
Tweezers
Tweezers are often included in diamond painting kits, especially with square diamonds (drills). Tweezers help with precise placement, adjusting, or removing diamonds. They’re especially useful for square diamonds or fixing mistakes.
Storage Containers And Bags
Proper storage is key for keeping your diamonds sorted by color and preventing spills or mixing.
Use containers or bags to sort and store diamonds by color, preventing spills and mix-ups. Labeling each compartment makes finding the right color easy.
Light Pad And Magnifiers
A light pad sits under your canvas to brighten symbols, making them easier to see. Magnifiers or lamps help with small details and reduce eye strain.
Step-By-Step Guide: How To Use Diamond Art Tools

Learning to use diamond art tools will help you complete your projects with less mess and more accuracy.
Each tool in the diamond painting kit has a specific job, making the process easier and the finished picture more precise.
1. Load Your Pen With Wax
First, find the wax square or pot inside your diamond painting kit. This pink or clear wax is used to help the pen pick up the tiny diamond beads.
Gently press the tip of your stylus pen into the wax so it fills the opening. You do not need a lot, just enough to fill the end. The wax should not overflow or come out the sides.
If your pen stops picking up diamonds, reload it with more wax.
The wax wears out after several uses, so this step may need to be repeated every so often during your project.
Pro Tip: Keep the wax covered when not in use. This prevents it from drying out or collecting dust and lint.
2. Pick Up And Place the Diamonds
Use the wax-loaded end of your pen to pick up diamonds, which are sometimes called drills. Lightly press the pen onto the flat, faceted side of a diamond so it sticks.
Make sure to check the symbol chart on your canvas, which tells you which color goes where. Then, line up the pen tip with the correct spot on your canvas and gently press the diamond in place.
Pull the pen away straight up to leave the diamond stuck to the adhesive canvas.
If a diamond lands crooked, push it into place with the pen or use the side of a tweezer for tiny adjustments.
It is important to work slowly to avoid picking up more than one diamond at a time, unless you are intentionally using a multi-placer attachment.
When first starting, using a single-placer tip on the pen can help you get neat, straight rows.
3. Use The Tray For Easy Sorting
Pour a small number of diamonds into the grooved tray included in most kits. Shake the tray back and forth gently so the flat sides of the diamonds face down. The grooves help line up the diamonds, making them easier to pick up with your pen.
Always use the tray that came with your kit or a similar one with raised ridges. It keeps colors separated and prevents accidental spills.
To minimize static, tap or gently scrape the diamonds with a plastic card before sorting. Do not overfill the tray. If too many diamonds are in the tray at once, it can be hard to grab just one color or bead.
When finished with one color, pour unused diamonds back into their original bag or container before moving on to the next shade.
When And How To Use Tweezers
Some diamond painting kits include metal tweezers, which offer precision for small spaces or fixing misplaced diamonds. Tweezers are especially useful if you need to remove a diamond from the adhesive or adjust its position.
Hold the tweezers like pencil, keeping your grip light but steady. Pinch and lift the diamond gently to avoid damaging the bead or the sticky canvas.
Tweezers can also be used to pick up and place square drills, which require careful alignment. In areas where diamonds are tightly packed or a mistake needs fixing, tweezers shine. They can grab individual diamonds more firmly than the pen.
However, tweezers may scratch some surfaces, so work slowly and carefully.
4. Organize Your Diamonds With Storage Solutions
Diamond painting kits often come with small resealable bags, but some people choose to upgrade to labeled plastic containers, pill boxes, or storage cases.
Proper organization reduces mix-ups and saves time. You can use small stickers or a marker to label each container by color number or name.
Arrange the containers in a box or tray so you can find whatever shade you need quickly. When switching between colors, reseal baggies or snap the lids closed. This prevents spills and keeps the colors from mixing.
Clean hands and a tidy workspace also help maintain your diamond supply. Some artists use stackable trays or drawer units so each project’s colors stay together. This is especially helpful for large or complicated designs.
5. Use a Light Pad For Better Visibility
A light pad is a flat, thin surface that lights up from underneath. Place your canvas on the pad to make tiny symbols easier to see, especially when working with dark colors or in low light.
Plug the light pad into a USB or power source, then adjust the brightness to suit your eyes. The extra light helps cut down on eye strain and lets you place each diamond more accurately. When shifting your canvas, make sure the pad stays level and free of dust.
If your kit did not include a light pad, many affordable models are available online. Some people find they can work longer and with fewer mistakes using this tool.
Having a well-lit area, even with just an LED desk lamp, helps too. The clearer you can see the chart and diamonds, the easier your project will be.
Tips For Getting The Best Results With Diamond Art Tools
To finish your diamond art with a neat look, you need to take care of both your tools and your workspace. Clean equipment and smart storage can make your kit last longer and your art process go smoother.
Keeping Tools Clean And Ready
Keeping your applicator pen, tweezers, tray, and wax clean helps your diamonds stick better and line up straight. Dirt and dust on the pen or tray can make it hard for diamonds to grab onto the tip or sit flat on the canvas.
After each session, use a soft, dry cloth to wipe your applicator pen and tray. Avoid using water, especially on the wax or glue side of your tools, since moisture can mess with their stickiness.
If you get wax stuck on your pen tip, gently scrape it off with a toothpick. Replace putty or wax when it starts to lose grip.
Old wax or dirty putty can leave marks on your diamonds. Keep extra wax in its package to prevent it from drying out. Using a straightening tool or ruler can help keep lines straight, but wipe these too to prevent buildup.
Storing Your Project And Accessories Safely
Safe storage is key to keeping your canvas, tools, and diamonds in good condition. When not working, roll your canvas with the design facing out to avoid creases.
You can also lay it flat in a clean, dry area away from sunlight. Store loose diamonds in small resealable bags or divided organizer boxes. Label each compartment with its code for easy sorting.
Avoid mixing colors in the same container, as sorting them later takes lots of time. Keep the tray, pen, tweezers, and wax in a small container or a sectioned box.
Use the original package if possible, because it's designed to keep parts together and safe from dust or spills.
Protecting your accessories from pets or little kids will help you avoid losing pieces or damaging your project.
Final Thoughts
Learning how to use diamond art tools is the secret to making your projects easier and more enjoyable. With just a little practice, you’ll place diamonds quickly and neatly, and your finished art will look amazing. Each tool, from the pen to the tray and light pad, has its own special job to help you along the way.
Whether you’re just starting out or want to improve your skills, using the right tools the right way makes all the difference. Try out different tools and see which ones work best for you. Happy diamond painting, and don’t forget to have fun with every sparkling piece!
Frequently Asked Questions
Do you need a brayer for diamond art?
A brayer is a rolling tool often used to press down the diamonds after placing them. Using one is optional, but it can help ensure your diamonds stick evenly to the canvas and lay flat.
If you notice loose drills or want to avoid air bubbles, a brayer can make a noticeable difference.
How to use a diamond art pen for beginners?
To get started, dip the hollow tip of your pen into a small amount of wax. The wax allows your pen to pick up the diamond drills easily.
Press the sticky side of the drill to the pen tip, lift it, and place it on the assigned spot on the canvas. Repeat as needed, and refill the wax when your pen stops picking up drills.
Why won't my diamond painting tool pick up?
If your pen isn’t picking up drills, most likely the wax has worn out or is missing from the tip. Remove the old wax and press the pen firmly into new wax.
Also, check for debris stuck in the pen tip and make sure the drills are facing the correct way. Clean both your pen and the surface of drills if needed.
How does a diamond art kit work?
A diamond art kit usually contains a pre-printed, sticky canvas, packets of colored resin drills, a diamond art pen, wax, and sometimes a tray.
You match the colors of the drills to symbols on the canvas, then use the pen and wax to pick up and place each drill in its correct spot. The adhesive on the canvas keeps the drills in place.
What is the best way to work on a diamond painting?
Start in a corner and work your way across the canvas to avoid smudging the adhesive. Keep the protective cover on areas you haven’t worked on yet to protect the stickiness.
Use a tray to organize drills. Work under good light to see the symbols clearly. Take breaks to keep your project neat and hands clean.


