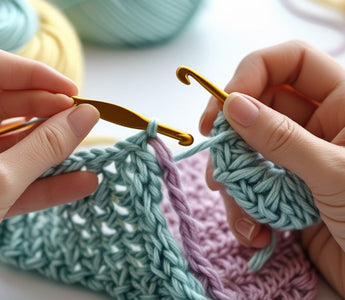
Ending a crochet project the right way matters just as much as starting it. To fasten off crochet correctly, you secure the last stitch so your work doesn’t unravel and your edges stay neat. This simple step gives your piece a clean, finished look that actually lasts, even through washing and everyday use.
Learning how to fasten off with care makes your projects look more polished. Whether you’re finishing a blanket, scarf, or amigurumi, understanding this part really helps you move from beginner to confident maker.
So, what does fastening off mean? How do you do it? We’ll go through the steps and talk about how to hide yarn ends for a smooth finish. With just a few easy techniques, you can make every crochet project look complete and secure.
Upgrade your crafting setup with premium yarns and kits. Browse our Knitting & Crocheting Collection for everything you need to create with confidence.
What Does It Mean to Fasten Off in Crochet?

Fastening off in crochet means you’re securing your final stitch so nothing unravels. Basically, you cut the yarn, pull it through the last loop, and weave in the tail to lock everything in place. When you do this right, your project stays neat and strong—ready for use or display.
Understanding the Purpose of Fastening Off
Fastening off is how you end your project safely by tying off the working yarn. This step keeps your stitches from loosening or coming undone. Without it, a little tug could start undoing your work.
It also gives your project a clean edge. Whether you’re making a blanket, scarf, or amigurumi, fastening off helps that last row look tidy.
There are a couple of ways to do this. The basic fasten off is quick and secure, while the invisible join blends the last stitch into the edge for a seamless look. Picking the right method makes your crochet look more professional and helps it last.
When to Fasten Off Your Project
You’ll fasten off crochet when you reach the end of your project, or any time you’re changing colors or yarn types. It marks the end of a section and keeps your stitches in place before you move on.
For projects with multiple colors, fasten off each color section before starting the next. Leave a yarn tail about 6 inches long so you can weave it in later. That tail helps secure the end and keeps things from fraying.
Here’s a quick checklist:
- End of project: Fasten off to finish up.
- Color change: Fasten off the old color before adding a new one.
- Shape change: Fasten off if you’re attaching a new piece or edge.
Knowing when to fasten off can save you from having to redo sections and keeps your project solid.
Common Mistakes Beginners Make
Beginners sometimes pull the yarn too tight or too loose when fastening off. If you pull too tight, the edge gets distorted; too loose, and you end up with gaps. Aim for a firm but gentle tension.
Cutting the yarn too short is another common mistake. Always leave enough tail to weave in securely. A short tail can slip out and cause unraveling later.
Skipping the weaving-in step weakens the finish. Use a yarn needle to thread the tail through several stitches in different directions. That way, it stays hidden and secure.
Don’t rush this step. Taking a few extra moments to fasten off properly makes your crochet look cleaner and helps it last.
Smooth stitches start with the right tools. Explore our Crocheting Needles Collection and find your perfect hook for every project.
Step-by-Step Guide on How to Fasten Off Crochet

To finish your crochet project neatly, you’ll need to close your last stitch, cut and secure the yarn, and hide the loose ends. These steps keep your work from unraveling and give it a clean, professional look.
Finishing Your Last Stitch
When you reach the final stitch, you’ll have one loop left on your crochet hook. Keep your tension steady so the last loop isn’t too tight or loose.
Yarn over once more, then pull the working yarn through the loop on your hook. That closes the stitch and locks it in place.
If you’re working in rounds, make sure your last stitch joins smoothly with the first one. Some crocheters use an invisible join for a cleaner edge, especially on circular pieces.
Check that your stitches look even and that there aren’t any open loops. Once you’re happy, remove the hook and hold the yarn tail so it doesn’t slip back through.
Cutting and Securing the Yarn
After your last stitch, cut the yarn about 4–6 inches (10–15 cm) from your project. That gives you enough tail to weave in later.
Pull the yarn tail all the way through the loop you just made and tighten it gently. That forms a small knot and keeps your stitches from coming undone. Don’t yank it too hard, or you might distort the edge.
If you need to sew pieces together—like with amigurumi or garments—leave a longer tail. Use a tapestry needle for joining parts or weaving in ends. Keeping tails secure at this stage helps your project stay together through use and washing.
Weaving in the Ends for a Neat Finish
Weaving in yarn ends hides them and strengthens your finished crochet. Thread the yarn tail onto a tapestry needle and work it through several stitches on the back or inside of your project.
Go in one direction for a few stitches, then double back through different stitches. This change in direction locks the yarn in place.
For flat projects, weave along the tops of stitches or through the middle of rows. For 3D pieces like amigurumi, pull the tail inside the shape before trimming.
Trim the excess yarn close to the fabric, but don’t cut the stitches. This last step keeps your crochet tidy and helps prevent fraying.
Tips for a Clean and Professional Look
A neat finish really depends on how you secure and hide your yarn tails. The right tools and techniques will help your crochet stay durable and free from loose ends that can mess up the look.
Choosing the Right Needle for Weaving Ends
A tapestry needle is your best bet for weaving in ends. It’s got a large eye for most yarns and a blunt tip that slides between stitches without splitting the fibers. Metal needles last longer, while plastic ones are lightweight and flexible.
Pick a needle size that matches your yarn. Bulky yarn? Go bigger. Fine thread? Use a smaller needle. A bent-tip needle can help you get under tight stitches more easily.
|
Needle Type |
Best For |
Tip |
|
Metal |
Durability and precision |
Ideal for frequent use |
|
Plastic |
Lightweight projects |
Good for travel kits |
|
Bent-tip |
Tight or dense fabric |
Easier to maneuver |
Keep your needle handy in a small case so you don’t lose it between projects. It’s easy to misplace those things!
How to Hide Yarn Tails Invisibly
To hide yarn tails, weave them through the wrong side of your work where stitches are less visible. Move the needle under several stitches, then double back in the opposite direction to lock the tail.
Don’t just weave in a straight line. Changing direction adds friction, which helps keep the tail from slipping out after washing or stretching. For best results, make three passes through different stitch paths.
Trim the end close to the surface, but don’t cut too tight. Leaving a tiny bit of slack keeps the fabric from puckering. If you’re working with textured stitches, follow the natural pattern so the tail blends in.
Extra Tips for Different Crochet Projects
Different projects need slightly different finishing methods. For amigurumi or stuffed toys, run the yarn tail through the stuffed body a few times to secure it inside. The stuffing helps grip the yarn and keeps it from unraveling.
For flat items like blankets or scarves, weave tails along the stitch rows on the back side. This keeps both sides looking smooth.
When you’re finishing lace or openwork, use a smaller tapestry needle and weave through solid stitch areas, not open spaces. That helps the fabric keep its shape.
Keep your projects neat and organized with reliable accessories. Discover essentials in our Crocheting Tools Collection.
Conclusion: How to Fasten Off Crochet
Fastening off your crochet project properly is the key to achieving a clean, polished finish that lasts. It’s a small step, but it makes a big difference in how professional your work looks.
Once you’ve mastered how to fasten off crochet, you’ll feel more confident completing any project—from cozy blankets to detailed garments. Practice makes perfect, and soon it’ll become second nature.
Ready to start your next crochet creation? Explore our guide to the best crochet kits and find everything you need to bring your ideas to life.
Frequently Asked Questions
Fastening off keeps your crochet from unraveling and gives it a clean finish. You can use simple methods for flat projects or more careful techniques for circular pieces like amigurumi.
What does it mean to fasten off in crochet?
To fasten off means you secure the last loop on your hook so your stitches don’t come undone. You do this after finishing the final row or round. It marks the end of your crochet before weaving in the yarn tail.
What is the best way to fasten off crochet?
Cut your yarn, leaving a tail of about 4–6 inches. Yarn over once and pull the tail completely through the last loop. This forms a small knot that locks your stitches. Then weave the yarn tail into nearby stitches with a tapestry needle to hide and secure it.
How to fasten off crochet rounds?
When finishing a round, make a slip stitch into the first stitch of that round to close it neatly. Cut the yarn and pull the tail through the last loop. For amigurumi, thread the tail on a tapestry needle and weave it through the front loops of each stitch around the opening, then pull tight to close the hole.
Is there a difference between fastening off and binding off?
Yeah, there is. Fastening off comes from crochet, and binding off belongs to knitting. Both terms mean you’re finishing up and making sure your stitches won’t unravel, but the way you do it isn’t quite the same. Crochet just deals with one active loop, while knitting has you juggling a whole row of loops on your needle.


