Learning how to crochet a beanie? It’s a fun, practical skill, especially if you’re just getting started with crochet for beginners.
You don’t need fancy tools or expert knowledge to whip up a cozy hat that fits well. Crocheting a beanie uses basic stitches and simple patterns, so even first-timers can follow along.
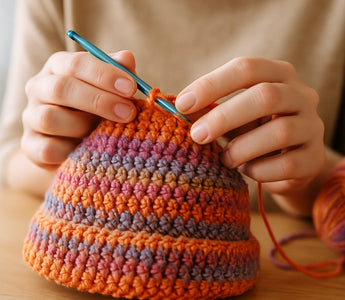
Beanies come in all sizes, from baby to adult, and you can pick yarns to match your style or mood.
Easy patterns with stretchy ribbing help the beanie fit comfortably on any head. Bulky yarn and simple stitches make the project move quickly, which is honestly pretty satisfying.
This guide breaks down each step so you can enjoy the process and end up with a warm, handmade accessory. Whether you wear it yourself or give it away, you’ll have something to be proud of.
What You Need To Crochet A Beanie & Choosing A Style

Before you start, make sure you’ve got the right supplies and a style in mind. Your choice of tools and beanie style shapes how the project turns out—and how easy it feels.
Yarn, Hook, And Essential Tools
Grab some worsted weight yarn; it’s easy to work with and keeps things warm. Most folks use a 5 mm crochet hook for this yarn, which makes a nice, balanced fabric. If you’re unfamiliar with yarn sizes, read our guide, Yarn Weight Guide: Find the Sizes for Your Projects
Don’t forget a few basics:
- Yarn needle: Handy for weaving in ends and finishing up neatly.
- Scissors: You’ll need these to cut yarn at the end.
- Soft tape measure: Use it to check head circumference, so your beanie actually fits.
Pick a crochet hook size that feels right. If the hook’s too big or small, your beanie might end up too loose or tight. Yarn labels usually suggest a hook size, but try a few and see what feels best for your hands and tension.
How To Measure And Start Your Beanie
Before you dive in, get the right measurements and pick a starting method. That way, your hat will fit nicely and look neat from the first stitch.
Measuring For The Perfect Fit

Wrap a soft tape measure around the widest part of your head, just above the ears. That’s your head circumference—it tells you how big to make your beanie.
Check out a crochet hat size chart for standard sizes like small, medium, or large. Crochet hats stretch a bit, so going slightly smaller can help you get a snug fit.
Measure from the crown down to where you want the hat to sit—over the ears or just at the forehead, your call.
Keep stitch markers handy to track rounds and fix things if your hat gets too tall or short.
Starting Methods (Magic Ring, Chain, Rectangle)
You’ve got options for starting your beanie.
The magic circle (or magic ring) gives you a tight, adjustable center with no hole. Make a loop, crochet into it, then pull it closed. Easy enough once you get the hang of it.
Or, you could start with a chain—usually 4-6 chains, then join into a ring. It’s simple, but sometimes leaves a little hole at the top.
Some folks like to crochet a rectangle and seam it into a circle at the end. It’s less common, but honestly, it can be easier if you’re brand new.
Each method changes how the top of your hat looks, so pick whatever feels right for you.
Basic Stitches And Easy Crochet Beanie Patterns

Learn a few basic crochet stitches and you can make all sorts of simple hats. Straightforward stitches and easy patterns help you build skills and end up with a practical beanie.
Must-Know Crochet Stitches
To crochet a beanie, you’ll want to know a few basics. Single crochet (sc) is the simplest—it makes a tight, dense fabric, great for warm hats.
Half double crochet (hdc) is a bit taller than single crochet. It creates a softer, stretchier hat and is perfect for beginners.
Double crochet (dc) stitches are even taller and make the fabric lighter and more open. If you’re after a slouchy or looser beanie, go for this one.
If you want a bit of flair, try the puff stitch. It adds texture and makes your hat pop, but it’s not much harder than the basics.
And don’t forget: crocheting in the round is key for hats. You’ll work in circles, not rows, so your beanie has no seams.
Read more about crochet sitches in our guide, Types of Crochet Stitches: Basic to Advanced Stitches.
Simple Patterns (Ribbed, Slouchy, Basic)
Beginner-friendly patterns use simple stitch repeats and basic shapes.
A classic basic beanie starts with a magic circle, then you build up with rounds of double crochet. It turns out smooth, stretchy, and fits most heads well.
Here are some simple patterns to follow:
The ribbed hat uses back-loop-only stitches for the brim, giving you that stretchy, knit-like look. It hugs your head and feels cozy.
This one shows an easy way to create a ribbed beanie:
For a laid-back vibe, try a slouchy beanie—just add more rows of double crochet. These have more room at the top and look relaxed.
For a mild slouch:
Most free patterns mix and match these stitches and shapes. Bulky yarn and bigger hooks speed things up and give your hat a chunky, cozy feel.
Customizing And Finishing Your Crochet Beanie
Make your beanie fit your style by picking the right size and colors. Add extras like pom-poms or labels for a unique touch. When you finish, sew up seams and tie off ends so your beanie looks polished.
Adjusting Size And Color
Measure your head’s circumference first. Adjust stitch count or add rounds to make the beanie tighter or looser. Need a bigger hat? Just add more rounds.
Pick yarn colors that speak to you—go solid, or mix two for stripes or patterns. Try different yarn weights to change how warm or light your beanie feels.
Tip: Check the yarn label for hook size suggestions. Bigger hooks give looser stitches, smaller ones make it tighter. Both size and texture change with your hook choice.
Adding Pom-Poms And Labels
Pom-poms are a fun way to finish your beanie. Make one from yarn, or grab a pom pom maker if you want perfect, fluffy circles. Faux fur pom poms look stylish and feel soft—no animals involved.
Attach your pom-pom by threading yarn through the top of your beanie and tying it tight. Sew on a label—maybe your name or a logo—for a personal touch. Labels can be store-bought or handmade from fabric or leather.
These little extras make your hat stand out and turn it into a thoughtful handmade gift.
How To Seam And Finish

When your beanie’s the right length, close the top. Turn it inside out, thread the yarn tail onto a needle, and weave in and out around the top edge.
Pull the yarn tight to close the hole, knot it, and tuck in any loose ends inside the hat.
If you’ve got a side seam from ribbing or starting rows, use the yarn tail to sew it up neatly. Hide rough edges by weaving the tail through the seam before you finish.
A clean finish keeps your beanie comfy and looking sharp.
Conclusion
Crocheting a beanie’s a pretty handy skill. You get to make warm, one-of-a-kind hats that suit your style or whoever you’re making them for.
Once you’ve got the basic stitches down, you can play around with different sizes and shapes. There’s a lot of freedom here—these projects make great gifts or just something fun for yourself.
You choose your yarn, color, and hook size, so every beanie turns out a little different. Change up those choices and you’ll notice the texture and warmth shift, too.
The magic circle or chain-start method gives you a tidy, closed top—definitely worth learning. When you weave in those yarn ends tightly at the finish, your beanie looks cleaner and lasts longer.
Want more simple and fun projects? Read our guide: 7 Simple Crochet Ideas for Beginners to Try Today.
And if you’re ready to tackle a bigger project, check out How To Crochet a Blanket: A Beginner's Guide for step-by-step help!
Frequently Asked Questions on Crocheting a Beanie
How many chains do you need to crochet a beanie?
The number of starting chains depends on your method. If you’re going with a chain base instead of a magic ring, just chain enough to match the beanie’s circumference.
For an adult, you’ll usually start with around 60 to 70 chains, but it changes with yarn thickness and hook size. If you use the magic circle method, you skip the chains and make a loop to crochet into, which closes up the top nicely.
It’s smart to measure your head, or whoever’s wearing it, before you start chaining away.
What crochet stitch is used for beanies?
Most folks start with the single crochet stitch because it makes a tight, warm fabric. If you want something looser, try half double crochet or double crochet stitches.
Some people add ribbing for texture by working in the back loops on the first rows.
How long does it take for a beginner to crochet a beanie?
If you’re just starting, expect to spend 4 to 8 hours on your first beanie. You’ll probably spread that out over a few days.
Your speed, yarn, and how comfortable you are with the stitches all play a part. If you’ve done basic stitches before, you might finish in 3 to 5 hours.
It helps to practice on a small swatch first to get your hands used to the movement and tension. And honestly, take breaks. No one wants sore hands or to get grumpy halfway through. Crocheting’s supposed to be relaxing, right?
How many chains do you need to crochet a beanie?
People ask this a lot, and hey, it’s important. Your starting chains depend on the size you want, your yarn, and your hook.
For toddlers, start with 40-50 chains. For kids, it’s usually 50-60 chains. For adults, stick to 60-70 chains.
Try a small test swatch to check your tension. If your stitches are tight, you’ll need more chains to get the right fit.
And always use a hook size that matches your yarn—that keeps your beanie comfy and the right size.
What is the hardest crochet technique?
For most beginners, crocheting in the round without twisting stitches can be tricky. Since beanies are usually made in circles, this skill’s pretty important.
Other things that trip people up? Increasing and decreasing stitches to shape the crown smoothly. Fancy stuff like cables or lacework is harder, but you don’t need that for a basic beanie.
If you practice simple rounds before starting your project, you’ll have a way easier time. Stitch markers help, too—they keep you from losing your place or mixing up rounds.
Is a beanie a good beginner crochet project?
Yeah, a beanie makes a solid first crochet project. You only need to know basic stitches and shapes to get started.
Most beginner patterns stick to simple stitches, like single crochet or half double crochet. That helps you learn without feeling overwhelmed.
You'll practice working in rounds or rows. Shaping the beanie with increases is a nice way to build your skills.
It's a small project, so you can actually finish it pretty quickly. That sense of progress? It keeps you going.
And honestly, it's satisfying to end up with something you can wear or give away. Who doesn't like a cozy beanie?
If you hit a snag, try searching for “beginner-friendly” patterns. Those usually walk you through each step.


