The best embroidery machine for hats holds curved surfaces tight, offers a big enough hoop, and stitches smoothly with thick threads.
You don’t have to be a pro to get great results. Modern embroidery machines guide threads with surprising precision, even on tricky caps.
Some models, like Caydo’s computerized embroidery machine support digital designs, so you can stitch logos, patterns, or text that match your projects for a complete handmade collection.
With the right setup, you can make hats that feel polished and personal. Whether you’re selling them with or giving them as gifts, the best embroidery machine for hats saves time and gives your work a professional finish.
Key Takeaways
- Pick a machine that handles curved hat surfaces with ease
- Look for features that improve design accuracy and thread control
- Use simple steps and practice to get professional hat embroidery results
Ready to start your next project? Check out our embroidery kit collection for everything you need in one place.
Key Features to Look for in a Hat Embroidery Machine

When you choose an embroidery machine for hats, you want tools that make stitching on curved surfaces simple and accurate. The right features let you focus on your craft instead of troubleshooting.
Embroidery Area and Hoop Compatibility
Hats need a specific hoop size and shape to hold the fabric steady while you stitch. A standard flat hoop usually struggles with curves, so look for a cap hoop or hat frame that locks the material in place.
Most embroidery machines for hats work best with a hoop size around 5" x 7" or bigger, giving you enough space for logos or small patterns.
Some machines include a cap driver attachment. This rotates the hat smoothly as the needle moves, keeping designs even and reducing puckering.
If you plan to embroider structured hats, this feature really helps.
Check if hoops come with the machine or are sold separately. Buying the right hoop later can add to your cost, so plan ahead.
Built-In Embroidery Designs and Editing Options
Built-in embroidery designs give you a head start. Many machines include 50 to 200+ designs, covering borders, fonts, and motifs.
Preloaded lettering styles are especially handy for hats since text is so common.
Editing options matter, too. You should resize, rotate, or mirror designs directly on the machine.
This lets you adjust logos to fit the curve of a hat without running back to your computer.
Some machines support USB or Wi-Fi transfer, so you can import custom files. That’s important if you make your own patterns or buy digital embroidery designs online.
Look for support of common file types like .PES, .DST, or .EXP for easy compatibility.
Color Touch Screen and User Interface
A color touch screen makes it easier to preview your design before stitching. You can see thread colors, layout, and the stitch path in real time.
This helps a lot with multicolor logos on hats.
Screens vary in size, but anything at least 3.5 inches or larger is more comfortable to use. Bigger screens let you zoom in and tweak details without squinting.
A clear interface cuts down on mistakes. Instead of guessing, you tap through menus, pick thread colors, and check stitch counts fast.
Many modern machines show step-by-step guides on the screen, which is great if you’re learning. When you’re testing machines, see how fast you can navigate the settings.
A simple, responsive screen really saves time.
Automatic Needle Threader and Ease of Use
Threading needles by hand is annoying, especially with lots of color changes. An automatic needle threader handles it in seconds and saves your eyes.
For hat embroidery, where you’ll swap colors often, this keeps things moving.
Some machines offer automatic thread cutting, trimming between color changes without scissors. That’s a small thing, but it adds up.
Look for clear setup instructions, quick bobbin winding, and front-loading bobbins. These details make the machine less intimidating and keep you focused on crafting.
If you’re new to embroidery, user-friendly controls and automatic helpers make everything easier. Even if you’re experienced, these features speed up production and cut down on errors.
Why Choose Caydo's Embroidery Machine

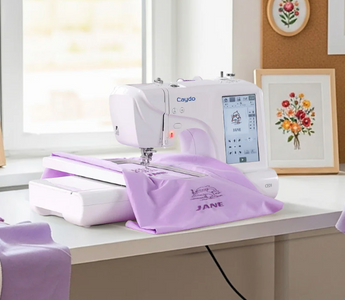
Computerized Smart Embroidery Machine CE01
You want a hat embroidery machine that makes your projects easier, not harder. Caydo’s model offers a large 7-inch touchscreen so you can see your design clearly and make changes with just a tap.
This feels less confusing than the tiny screens on a lot of beginner machines.
The machine comes with two hoop sizes: 4x4" for small patches and 4x9.25" for bigger designs. That flexibility helps when you want to stitch logos on hats or decorate larger pieces.
Many popular machines, like the Brother PE800 or SE1900, stick with a 5x7" area, but Caydo gives you more options.
You also get a full starter kit—hoops, scissors, stabilizer sheets, and thread. So you can start embroidering hats or patches, right away without hunting for accessories.
This is a big help if you’re new and don’t want to chase down supplies.
For crafters comparing options, Caydo hits a sweet spot between beginner ease and creative freedom. High-end machines like the Janome MB-4S or Melco EMT16X are powerful but cost way more and target businesses.
Caydo’s machine gives you a budget-friendly way to try hat embroidery before moving up to pro models.
Quick highlights:
- 7" touchscreen for clear previews
- Two hoop sizes for small and large projects
- All-in-one kit to start right away
- Beginner-friendly support without steep learning curves
Add a splash of color to your designs. Shop our embroidery floss collection and find the perfect shades to bring your ideas to life.
Tips for Successful Hat Embroidery Projects

Working with hats can be tricky thanks to their curves and stiff fabrics. You need to think about design size, placement, and how to keep the cap stable during stitching.
Regular care of your embroidery machine really helps the quality of your finished projects.
Selecting the Right Embroidery Designs
Pick designs that fit the small, curved area of a cap. Large or dense patterns tend to pucker or distort on structured hats.
Simple logos, text, or clean line art stitch more smoothly. Watch the stitch count—a design with fewer stitches cuts down on thread breaks and keeps the hat from getting too stiff.
Satin stitches work great for lettering because they look bold without adding bulk. If you want to add detail, layer carefully. Combine a filled shape with lighter outlines instead of stacking heavy fills.
Test stitch on scrap fabric before moving to the hat. It’s worth it—this helps you spot problems early and tweak size or density.
Discover more by reading our article: Unique Embroidery Gift Ideas To Make and Share for thoughtful projects everyone will love.
Hooping Techniques for Caps
Hats need special cap frames or hoops to hold them in place. Flat hoops just don’t grip the curved bill and crown well.
A cap frame keeps the fabric tight so your design stitches evenly. When hooping, center the seam of the cap with the middle of your design.
Use clips or stabilizer backing to reduce shifting. Tear-away stabilizer works for most structured caps, while cut-away adds strength for stretchy or unstructured hats.
Always smooth the fabric before you lock the hoop. Even small wrinkles can mess up alignment.
If your machine allows, tilt the cap slightly forward in the frame to match the curve of the hat. This cuts down distortion and keeps the stitches clean.
Maintenance and Troubleshooting
Clean your embroidery machine often, especially after working with heavy fabrics like hats. Dust, lint, and thread bits can cause skipped stitches.
Use a soft brush or small vacuum to clear the bobbin area. Check your needles before each project—a dull or bent needle can snag thick hat fabric.
For most caps, a size 75/11 or 80/12 embroidery needle works best. Change needles regularly to prevent thread breaks.
If you notice looping or weird tension, rethread the machine and check the bobbin.
Hats put more strain on the thread path, so even a small misthread can cause issues. Keep extra stabilizer, needles, and thread nearby so you can fix problems without stopping your project.
Looking for fresh inspiration? Check out our guide, Top 5 Easy Craft Ideas for Adults That Anyone Can Try at Home and discover fun projects to enjoy.
Final Thoughts
Finding the best embroidery machine for hats is easier than it seems. Decide whether you need a beginner-friendly model or a multi-needle machine for advanced projects. Look for features like a sturdy hat hoop, smooth stitching, and simple controls to make embroidery stress-free.
With the right setup, you can add names, logos, or patterns to caps that look polished and professional. A good machine saves time, boosts creativity, and makes every project fun.
Also read our guide: How to Remove Embroidery Safely Without Damaging Fabric to learn how to clean up stitches the right way if you made mistakes.
Frequently Asked Questions
Do embroidery machines work on hats?
Yes, embroidery machines can stitch on hats, but not every model handles them well. You need a machine with a cap hoop attachment to keep the curved surface steady.
Flat hoops don’t hold hats securely, which causes shifting and uneven stitching.
What machine do lids use for hats?
Lids, the retail hat store, uses multi-needle commercial embroidery machines. These have cap frames for curved surfaces, letting the needle reach tough spots like the front panel near the bill.
They’re built for speed and can stitch detailed logos quickly.
What are the best hats to embroider on?
Structured caps with a firm front panel hold designs best because the fabric doesn’t collapse under the needle. Cotton twill and polyester blends are common choices since they stay smooth during stitching.
Avoid stretchy or thin fabrics because they can pucker even with stabilizer.
What does it cost to embroider a hat?
If you order embroidery services, you'll probably pay $10 to $20 per hat. That price depends on the stitch count and how big your design is.
Custom shops might tack on a one-time setup charge to digitize your logo. If you've got your own embroidery machine, your costs drop to just thread, stabilizer, and the blank hat.


