Diamond painting is a craft where you create shiny mosaic pictures by placing small, colorful resin "diamonds" onto a sticky canvas with a printed design.
This art is simple to learn and has gained popularity with both beginners and hobbyists thanks to its relaxing and creative nature.
If you’re looking for a new, hands-on way to unwind or add a personal touch to your space, diamond art offers a fun and rewarding experience.
You might wonder what is diamond painting and how to get started. In this post, you’ll learn the basics about this unique craft, what materials you need, and the easy steps involved. With a clear guide and helpful tips, you’ll be ready to start your sparkling masterpiece.
What Is Diamond Painting?
Diamond painting is a craft activity in which you create sparkling art by attaching tiny resin "diamonds" to a sticky, pre-printed canvas. It blends techniques from cross-stitch and paint-by-numbers and results in a colorful, mosaic-like image that catches the light.
How Diamond Painting Works
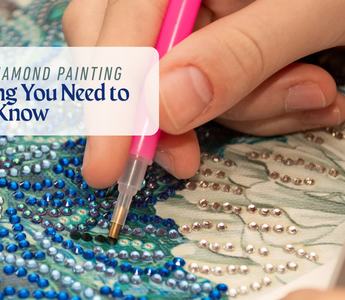
When you start a diamond painting, you get a kit that usually includes a printed canvas, colored resin diamonds (drills), an applicator tool, and wax or glue.
The canvas has a coded design that tells you where each color of the diamond should go, similar to a legend or chart. You dip the applicator in wax, pick up a diamond, and place it onto the sticky area according to the code.
You work through the picture section by section, pressing each diamond down where it belongs. The diamonds are often round or square, which affects how the finished art looks. Round diamonds are easier to place, while square diamonds give more complete coverage.
The image becomes bright and shiny as you fill the canvas, almost like a mosaic. The finished piece can be framed for display or given as a gift.
Difference from Paint-By-Numbers and Cross-Stitch
Diamond painting is similar to paint-by-numbers and cross-stitch but uses small plastic gems instead of paint or thread.
With cross-stitch, you use a needle and colored thread to make x-shaped stitches on fabric. In diamond painting, you stick flat-backed diamonds to a sticky surface. There's no sewing involved, and the process is less messy.
Paint-by-numbers uses paint applied to marked sections of a canvas using brushes. Each area has a number that matches a paint color. You still follow a code in diamond painting, but instead, you place diamonds, not paint, in each spot.
This craft is popular because it's relaxing, requires little setup, and gives you a finished piece that looks both unique and polished. Many people try diamond painting because it is simple to learn and gives a sense of accomplishment after each project.
|
Feature |
Cross-Stitch |
Paint-By-Numbers |
Diamond Painting |
|
Material Used |
Thread and fabric |
Paint and canvas |
Resin diamonds |
|
Tools |
Needle |
Brushes |
Applicator pen |
|
Skill Needed |
Stitching |
Painting |
Placing diamonds |
|
Finished Look |
Textile art |
Painted art |
Sparkling mosaic |
📌Also Read: Embroidery vs. Cross Stitch: Which Needle Art Is Right for You?
Essential Diamond Painting Materials You’ll Need
When you start diamond painting, having the right materials makes the process much easier. Some tools come in every diamond art painting kit, while others are extras you can add for a smoother experience and better results.
The Diamond Painting Kit Breakdown

Every diamond painting kit usually comes with the basics you need to begin:
- Pre-printed adhesive canvas has a sticky surface and a color-coded chart. The pattern shows you where to place each resin rhinestone.
- Resin diamonds (drills): These colorful pieces come in small packets, sorted by color. Each one matches a symbol on your canvas. Most kits include extra drills in case you lose some.
- Electric Diamond Painting Art Pen and Wax: You use the dabbed in wax to pick up each diamond and stick it on the canvas. This tool helps you work faster and more accurately.
- Tray and storage containers: The tray lets you shake out the diamonds so the flat side faces down, making them easy to grab. Some starter kits include small bags or boxes to organize the different colors.
Optional Accessories for Better Results
You can improve your diamond painting results with a few optional tools:
- Light pad: Placing your canvas over a light pad makes the symbols and colors easier to see, especially in dim lighting.
- Multi-placer tool: This attachment lets you pick up several diamonds at once, helping you finish large sections of the same color more quickly.
- Sealant: After finishing your picture, you can use a sealant to lock the diamonds in place. This helps the art last longer and keeps the diamonds from falling off over time.
Other extras some people use are larger storage boxes, extra trays, or comfortable grips for the pen, but you only need the basics to get started.
📌Also Read: How to Do Screen Printing on Fabric: 7 Simple Steps
How to Do Diamond Painting: Step-by-Step Guide for Beginners

Diamond painting is easy to learn and relaxing. To get a great finished piece, you will need a clean area, a kit with tools and diamonds, and a little patience.
Step 1 – Prepare Your Workspace
Choose a flat table or desk with good lighting. This will help you see the small symbols and colors clearly.
Clear the space of clutter. Wipe the surface to keep dust or dirt from sticking to your canvas.
Lay out all your supplies: the canvas, diamonds, tray, wax pad, and applicator pen. Sort your diamonds by color into small containers or bags, and label them. Keeping everything organized helps you work faster and avoid losing tiny parts.
If you like, use a non-slip mat or cloth to prevent anything from sliding around. Make sure your chair is comfortable, since you might sit for a while.
Step 2 – Understand Your Canvas and Symbols
Unroll your canvas and look at the chart on the side or back. The chart has symbols, numbers, or letters that match the diamond bags.
Each symbol on the canvas shows where to place a specific colored diamond. Depending on the kit, the color codes may be DMC numbers, letters, or other symbols.
It helps to find one area with just a few symbols and start there. Double-check the symbol and color code before placing each diamond. This will help you avoid mistakes and keep your project neat.
You can keep a copy of the symbol chart nearby to check easily as you work.
Step 3 – Pick Up Your Diamonds with the Applicator Pen
Peel back the plastic film over your wax, then gently press the applicator pen's tip into the wax. The wax helps the pen pick up diamonds and makes it easier to place them precisely.
Pour a small amount of the diamonds you need into the tray. Shake the tray lightly so most diamonds turn upright, with the flat side down.
Push the tip of your pen onto the top of a diamond, and the wax will make it stick. Do not use too much force, which can damage the wax or break the pen tip.
If your pen stops picking up diamonds well, add more wax.
Step 4 – Place Diamonds on the Adhesive Canvas
Peel back only a small part of the canvas cover to keep the sticky area clean. Work on one section at a time. This helps keep the glue fresh and avoids dust or hair sticking.
Match the diamond color and symbol, then place the diamond on its spot using the pen. Press down gently.
Use the following steps for best results:
- Place diamonds straight so the lines look neat.
- Adjust with tweezers if a diamond seems crooked.
- Fill in one color for a section before moving to the next.
Do not peel the cover off at once, or the sticky layer may dry or get dirty.
Step 5 – Finishing Touches and Sealing Your Artwork
After finishing the entire canvas, check for missing diamonds and press all diamonds down firmly with a clean, flat object, like a book. This makes sure they stick well.
If you like, seal your artwork. To help keep the diamonds from falling off, use a clear sealant or glue designed for diamond paintings. Let the sealant dry completely before touching it.
You can frame your diamond painting like a photo or poster to display it. Some people use foam board or cardboard for extra support before framing, which gives the finished project a clean, professional look.
📌Also Read: Double Stitch Knitting Tips for Perfect Reversible Work
Tips and Tricks for a Perfect Diamond Painting Experience

Staying organized helps you avoid losing diamonds and makes your progress much smoother. Knowing how to fix common mistakes ensures your finished artwork looks neat and colorful.
Keeping Your Workspace Organized
Try to keep your tools and materials in one place. This will make it easier to find what you need and reduce stress while working.
Here are some simple ideas to stay organized:
- Use storage containers: Small plastic boxes, pill organizers, or bead storage cases work well for storing diamond drills.
- Label each container: Write the color code or symbol on each container with a sticker or permanent marker. This will help you quickly identify the right color.
- Sort your drills before you start: Laying out your colors before working can save time.
- Work in small sections: Peel back only part of the cover sheet to avoid dust and losing stickiness.
A neat workspace can make the painting process faster and more fun.
Fixing Common Diamond Painting Mistakes
Mistakes can happen, but most are easy to fix. Learning some simple tricks helps you keep your painting looking great.
- Reposition misplaced diamonds: Use a pair of tweezers or the tip of your pen tool to gently lift and move diamonds that are in the wrong spot.
- Straighten crooked drills: Press gently with a straight edge, like a ruler or plastic card, to line up diamonds neatly.
- Fix wrinkles in the canvas: Place a heavy book or box on top of the flat canvas for a few hours. For deeper wrinkles, turn the canvas over and gently iron the back using low heat. Always put a towel between the canvas and iron.
You can fix minor problems and enjoy a better diamond painting experience by staying careful and patient.
📌Also Read: How to Use a Yarn Winder for Perfect Yarn Cakes
Creative Ways to Display and Use Finished Diamond Paintings
Finished diamond paintings can be more than just a fun project. You can show them off as wall art or turn them into special gifts for your loved ones. Here are some easy and creative ways to use your completed pieces:
Framing Your Diamond Painting
Framing is one of the best ways to display your finished diamond painting.
Here’s how you can do it:
- Pick a frame that matches the size of your painting. Poster frames work well for big pieces, while decorative frames are nice for smaller ones.
- Look for budget-friendly frames at stores like Walmart or Target. Always measure your painting first to make sure it fits.
- Add a piece of sturdy cardboard behind your painting for support. This helps keep it flat and neat.
- Use double-sided tape to hold the canvas in place inside the frame.
- If you have a lot of finished paintings, try using a portfolio book. It’s a great way to keep them safe without taking up wall space.
- Some companies make special frames just for diamond paintings. These have extra depth for the beads.
Fun and Unique Diamond Painting Project Ideas
Don’t just hang your paintings on the wall.
Try these creative ideas:
- Turn finished diamond paintings into personalized gifts. Create custom portraits for birthdays, holidays, or other special occasions. They make great keepsakes.
- Small diamond paintings make great holiday decorations. Attach a ribbon to the back and hang them as ornaments or on the wall.
- Glue your finished painting to a tray, storage box, or notebook cover for a unique look.
- Make accent pieces for your home, like small framed paintings for your bathroom, entryway, or kitchen.
- Group several small diamond paintings together to create a gallery wall. You can also make seasonal displays to add color and fun to your living space.
With a bit of creativity, your finished diamond paintings can become beautiful decor or thoughtful gifts that everyone will love.
📌Also Read: Yarn Weight Guide
Why Try Diamond Painting?

Diamond painting can help you relax after a long day. Placing small, colorful gems on a canvas lets your mind focus and take a break from daily stress. Many people find it calming and use it for mindfulness.
This craft gives you a sense of accomplishment. Each finished project is something you made by hand. You can see your progress as you complete each section.
Diamond art is also great for decorating your home or giving as a gift. The sparkle from the gems adds a unique touch to any room. Handmade diamond paintings can make thoughtful presents for friends or family.
Some benefits of diamond painting include:
- Relief from stress
- Improved focus and patience
- Increased creativity
- Fun solo or as a group activity
- Customizable décor for your space
You do not need any special skills to get started. Kits usually include all the tools you need. Just follow the pattern and watch your picture come to life.
Conclusion: Start Your Diamond Painting Journey Today!
Diamond painting is easy and fun. You place tiny diamonds on a sticky canvas to make your sparkling art. Most kits have everything you need, and you don’t need any special skills.
This relaxing hobby can be done alone or with friends. Share your work online and join the diamond painting community for tips and support.
Want to make things even easier? Speed up your projects with an electric diamond art pen from Caydo.
Pick a kit and start your diamond painting adventure today!
FAQs About What Is Diamond Painting
Diamond painting is an easy-to-learn hobby that people of many ages can enjoy. The kits and tools are widely available and come at different price points.
Is diamond painting hard to learn?
Diamond painting is easy to learn, even for beginners. The kits come with clear instructions and all the tools you need. You simply pick up the colored diamonds with a pen tool and place them on the sticky canvas according to the chart. Most people find it relaxing and fun, not difficult.
How long does it take to finish a diamond painting?
How long it takes to finish a diamond painting depends on the size and your pace. Small designs can be done in a few hours or days, while larger pieces might take a couple of weeks if you work on them a little each day. Many people enjoy taking their time and working on it in short sessions. There’s no rush, so you can go at your own speed.
Can diamond paintings be washed or cleaned?
You should not wash diamond paintings with water, as moisture can damage the adhesive and the canvas. Instead, gently dust the surface with a soft, dry cloth or a small brush to remove dirt. If you want extra protection, consider framing your finished piece under glass. This keeps it clean and makes it last longer.
Are diamond painting kits expensive?
Diamond painting kits are generally affordable, with prices starting around $10 for smaller designs. The cost goes up for larger or custom kits, but most options fit a range of budgets. You get everything you need in one package, so there are no hidden costs. It’s a cost-effective craft compared to many hobbies.
Where can I buy diamond painting kits?
You can buy diamond painting kits online from major retailers like Amazon, Etsy, or specialty craft stores. Many brands also have their websites with a wide range of designs. Some local craft shops carry kits as well. Always check reviews to make sure you’re getting good quality.
Can kids do diamond painting?
Kids can do diamond painting, especially with kits designed for children. The activity helps develop fine motor skills and focus, making it great for young crafters. It’s important to supervise younger kids, as the diamonds are small and could be a choking hazard. Always choose age-appropriate kits for safety and fun.


