How to block knitting is one of the most common questions beginners ask once they finish a project. Blocking is the secret to making your stitches look smooth, even, and professional.
The process may sound technical, but it’s actually simple with the right method. A little water, some pins, and patience can completely transform how your project looks and fits.
In this guide, we’ll walk through why blocking matters, the different methods you can try, and step-by-step instructions to get beautiful results every time.
Upgrade your projects with quality yarns that block beautifully. Explore our Knit and Crochet Yarn Collection to find colors and textures you’ll love working with.
Why Blocking Matters in Knitting

Blocking knitting changes how your finished piece looks and fits by setting the fabric into its final shape. Using moisture or heat relaxes the fibers, letting you adjust size, smooth edges, and highlight stitch patterns.
Benefits of Blocking Your Projects
Blocking makes your knitting look more even and polished. When you block wool or other animal fibers, moisture temporarily breaks hydrogen bonds in the fibers. As the fabric dries, new bonds form, locking the piece into the shape you’ve set.
This process straightens uneven stitches and relaxes curling edges. Lace opens up, cables stand out, and stockinette stitch lies flatter.
Blocking also improves how garments drape. A sweater may hang better after wet blocking, and a shawl can have more defined points when pinned out. Even socks or mittens look neater and more uniform after blocking.
For acrylic or other synthetic fibers, spray blocking or gentle steam works best. Be cautious with heat, since too much can permanently change synthetic fibers and there’s no going back if that happens.
When You Should Block Knitting
Projects made with wool, alpaca, or other natural fibers usually benefit from blocking. These fibers absorb water and reshape easily, so wet blocking works especially well. Blocking before sewing pieces together can also help seams line up and look tidier.
Blocking matters for swatches too. If you measure a gauge swatch before blocking, you’ll get inaccurate results. After blocking, the fabric shows its real size and drape, which helps you get the right fit for sweaters or other garments.
Not every project needs blocking. If you knit something simple with acrylic yarn and the edges already lie flat, you might skip it. But for lace, cables, and any garment where fit counts, blocking is almost always worth your time.
Types of Blocking Methods

You can shape your knitting in a few different ways, depending on the fiber and the finish you want. Each method uses moisture and gentle handling to relax stitches and create a smoother fabric.
Wet Blocking
Wet blocking works best for natural fibers like wool, alpaca, and cotton. You soak the finished piece in cool or lukewarm water until the fibers are saturated. You might add a bit of wool wash if you want to clean the project at the same time.
After soaking, press out excess water with a towel. Don’t wring or twist the fabric, since that can stretch or damage it. Lay the piece flat on blocking mats or a clean surface, then pin it to the measurements you want.
This method gives you the most control over shaping. It’s especially helpful for lace, since you can open up the pattern and set the edges firmly in place. The fabric holds its shape after drying.
Steam Blocking
Steam blocking uses heat and moisture without fully soaking the fabric. Place your project on a flat surface and pin it into shape. Hold a steam iron or garment steamer a few inches above the fabric, letting the steam relax the fibers.
Don’t press the iron directly onto the knitting unless the yarn label says it’s safe. Direct contact can flatten stitches or burn delicate fibers. Keep the iron moving and let the steam do the work.
This method works for wool blends, acrylics, and projects that need only light shaping. It’s faster than wet blocking and helps with curling edges or uneven stitches.
Spray Blocking
Spray blocking is a gentle option for projects that need only minor adjustments. Lay your piece flat, smooth it into shape, and pin it if needed. Use a spray bottle to mist the fabric evenly with water until it’s damp but not soaked.
Let the fabric dry completely before removing pins. This method isn’t as intense as wet blocking but still helps relax stitches and straighten edges.
Spray blocking works well for delicate fibers, small projects, or when you want to avoid a full soak. It’s also handy if you need to refresh a piece’s shape after wearing or washing.
Want to knit faster and try bigger projects? Discover our Automatic Knitting Machine Collection and create pieces ready to block in no time.
Step-by-Step Guide to Blocking Knitting
Blocking helps your finished knitting look smoother, more even, and closer to the size you want. You’ll need the right tools, a clean space, and a bit of patience while the fibers set.
Preparing Your Materials and Space
Gather your supplies: T-pins, a blocking mat or foam tiles, and a few clean towels. For shawls or sweaters, blocking wires or foam cords help keep edges straight. For socks, a sock blocker is handy.
Wash your project gently before blocking. Use wool wash, mild soap, or a no-rinse detergent. Fill a sink or bucket with lukewarm water and let the piece soak for 15–20 minutes. Don’t wring the fabric, as that can stretch or damage the fibers.
Pick a flat, dry surface where your project can stay undisturbed while drying. A table covered with towels or interlocking foam mats works. Make sure pets can’t reach the area, and that you won’t need to use the space for a day or more—drying can take a while.
How to Pin and Shape Your Project
Lay your damp knit flat on the mat or towel. Gently press it into shape, following the finished measurements from your pattern. Use a tape measure if you want to check width and length.
For straight edges, thread blocking wires or foam cords through the sides before pinning. This reduces waviness and keeps edges even. For curved shapes, flexible wires or more pins work best.
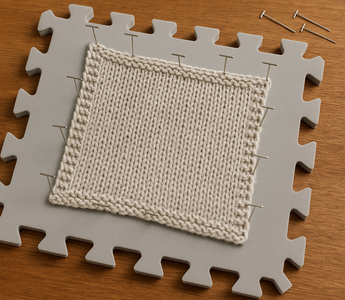
Place T-pins at an angle, pointing outward, every few inches around the edge. This holds the fabric in place. If you’re blocking lace, pull the points outward until the pattern opens and pin each tip. For socks, slide them onto a sock blocker instead of pinning.
Drying and Finishing Tips
Once pinned, let your project dry completely. Depending on thickness and the room, this might take 24–48 hours. Try not to move the piece before it’s fully dry, or the shape could shift.
If you prefer a lighter touch, use a spray bottle to mist the fabric instead of soaking. This works well for delicate fibers or small tweaks. For cotton or linen, gentle steam blocking with an iron held above the fabric is another option.
Check the project occasionally to make sure the pins stay put. When the fabric is completely dry, remove the pins or wires carefully. The stitches should look even, the shape should hold, and your piece will be ready to wear or assemble.
Keep your tools organized so blocking and finishing are stress-free. Shop our Knitting Needle Case Collection for stylish, practical storage.
Conclusion: How To Block Knitting
Blocking is the finishing touch that takes your knitting from handmade to polished. With just a little extra time, your stitches will lie flat, your patterns will shine, and your projects will look their best.
Whether you choose wet, steam, or spray blocking, the key is working carefully and letting the fabric set into shape. Once you try it, you’ll see how much of a difference it makes.
Ready to keep building your knitting skills? Check out our guide on Double Stitch Knitting for your next technique.
Frequently Asked Questions: How To Block Knitting
Blocking can seem confusing at first, but it’s pretty straightforward once you get the hang of it. You can use water alone, decide when blocking is needed, and adjust how often you repeat the process depending on the project and fiber type.
Can you block knitting with just water?
Yes, you can. Water is often all you need to relax the fibers and shape your project. You can soak, spray, or steam your knitting without adding detergent unless you want extra cleaning or softness.
Do I need to block my knitting?
Almost every project benefits from blocking. It helps even out stitches, smooth seams, and set the final shape. Blocking is especially important for lace, cables, and swatches where stitch accuracy and drape matter.
How long to soak before blocking?
Most projects need to soak for 15 minutes to 1 hour. That gives the fibers time to absorb water fully. Try not to agitate the fabric while it soaks—this helps prevent stretching or felting.
Do you need to block knitting after every wash?
Not necessarily. Some pieces keep their shape just fine after the first block, but others might need a gentle re-block after washing or if they've been stored for a while. If the fabric looks a bit off—maybe uneven or stretched—a quick block usually brings it back to form.


