Making a paracord bracelet is one of the most enjoyable and practical crafts you can try at home. It is simple enough for beginners and useful for anyone who enjoys outdoor activities or creative DIY projects.
Whether you want a stylish accessory or a survival tool, learning how to make a paracord bracelet is a fun way to create something unique with your own hands.
Keep reading to discover everything you need to get started, from materials and steps to creative ideas and helpful safety tips.
What You’ll Need to Make a Paracord Bracelet
Before you start weaving, gather a few basic materials. Having everything ready makes the process smoother and more enjoyable.
You’ll need:
✅ Paracord: Choose a strong cord, such as 550 paracord, made from nylon and known for its strength and flexibility.
✅ Buckle or clasp: A side-release buckle is easiest for beginners.
✅ Scissors: For cutting the paracord cleanly.
✅ Lighter: To melt and seal the ends so they do not fray.
✅ Measuring tape or ruler: For accurate sizing.
Safety Tip: Always melt the ends of your paracord after cutting to keep them from unraveling. Use a lighter in a well-ventilated area and avoid touching the melted ends until they cool.
Environmental Note: Paracord is made from nylon, which is not biodegradable. Dispose of scraps responsibly or reuse them for smaller crafts to reduce waste.
Step 1: Measure Your Wrist and Cut the Paracord

The first step in learning how to make a paracord bracelet is getting the right fit. A bracelet that is too tight will be uncomfortable, while one that is too loose may slip off.
- Wrap a measuring tape around your wrist to find your wrist size.
- Add about one inch to that measurement for comfort.
- For every inch of wrist size, cut about one foot of paracord. For example, a 7-inch wrist needs around 7 feet of paracord.
This small adjustment ensures your bracelet fits perfectly and looks great.
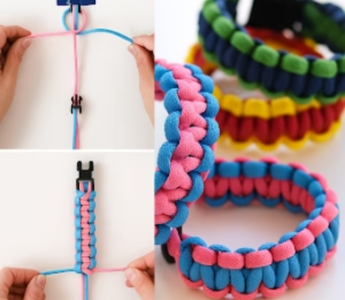
Step 2: Set Up the Buckle or Starting Point
Once your cord is cut, it’s time to attach it to the buckle. This step sets the foundation for your bracelet.
- Fold your paracord in half and thread the loop through one end of the buckle.
- Pull the loose ends through the loop and tighten.
- Attach the other ends to the second buckle piece, keeping the cords even.
If you prefer a simpler closure, you can skip the buckle and tie a loop and knot finish instead.
Step 3: Learn the Basic Cobra Weave (The Easiest Bracelet to Make)
The cobra weave is the most popular and easiest pattern for beginners. It’s strong, neat, and looks great with any color combination.
- Place the cords flat with the buckle ends facing up.
- Take the left cord, cross it over the center strands, and under the right cord.
- Then take the right cord, pass it under the center strands, and through the loop on the left side.
- Pull tight and repeat the process, alternating sides each time.
Keep your knots even and snug for a clean look. The cobra weave is a great starting point before trying more advanced designs.
Step 4: Tighten, Trim, and Finish Your Bracelet
When you reach the end of your bracelet, it’s time to finish it neatly.
- Stop weaving when you have about half an inch left before the buckle.
- Trim the extra cord close to the last knot.
- Carefully melt the ends with a lighter to seal them.
This step gives your bracelet a polished, professional look and helps it last longer. Remember to let the melted ends cool before touching them.
Creative Paracord Bracelet Designs to Try
Once you master the basic cobra weave, you can explore different designs to make your bracelet stand out. There are many patterns and color combinations to try, from simple two-color styles to complex weaves.
Popular variations include:
- Two-color cobra weave: Mix two shades for a bold look.
- Fishtail design: A tighter, more detailed pattern.
- Mad Max survival bracelet: A rugged option for outdoor enthusiasts.
- Corkscrew pattern: Adds texture and visual interest.
📌 If you enjoy creative handcrafts like this, check out Step-by-Step Lanyard String Design to learn more about colorful weaving patterns. You’ll find great ideas that can inspire your next paracord or lanyard project.
Paracord vs. Parachute Cord: What’s the Difference?
Many people wonder if paracord and parachute cord are the same thing. While they are related, there is a small difference.
Paracord is a type of parachute cord made from nylon with several inner strands, giving it excellent strength and flexibility. Parachute cord is a broader term that includes various cords used in parachutes and other gear.
Paracord 550, which meets the U.S. military specification MIL-C-5040H Type III, is the most common type for bracelets because it balances strength and comfort.
📌 If you like working with cords and threads, browse DIY Jewelry Making: Creative Ideas for Beginners to discover new ways to use cords, beads, and charms for your next project.
How Strong Is a Paracord Bracelet?
A paracord bracelet is more than just an accessory. It can be a reliable tool in outdoor situations.
Standard 550 paracord can hold up to 550 pounds of weight, according to U.S. military standards. You can unravel it to tie gear, build a shelter, or even replace a broken shoelace.
However, it should not be used for climbing or load-bearing safety tasks, since it is not certified for those uses.
This strength and versatility make paracord bracelets popular among outdoor enthusiasts, campers, and survivalists.
DIY vs. Buying: Is It Cheaper to Make Your Own Bracelet?

Making your own paracord bracelet is usually cheaper than buying one. You only need a few simple tools and some cord, which can make several bracelets.
DIY bracelets also let you choose your colors, patterns, and buckle types. Plus, the process itself is fun and rewarding. Creating your own design gives your bracelet a personal touch that store-bought ones can’t match.
📌 If you enjoy making bracelets, discover beautiful friendship bracelet patterns in Heart Friendship Bracelet Pattern: Easy DIY Guide for more creative inspiration.
Troubleshooting Common Mistakes
Even with careful work, small mistakes can happen. Here are some common ones and how to fix them:
- Uneven knots: Keep your tension consistent with each weave.
- Bracelet too tight or loose: Measure your wrist again and adjust the length before starting.
- Frayed ends: Always melt the ends after cutting to prevent unraveling.
- Twisted cords: Keep your strands flat and untangled as you weave.
Taking your time and practicing will help you improve with every bracelet you make.
📌 If you enjoy hands-on crafts and want to expand your skills, check out Lanyard Weaving: Fun and Easy Craft Ideas for Beginners for more step-by-step projects that use similar techniques.
How to Make a Paracord Bracelet Without Buckles
If you prefer a simpler style, you can make a paracord bracelet without a buckle. This method uses a loop and knot closure instead.
- Start by folding your paracord in half and creating a small loop at one end.
- Begin weaving the cobra pattern as usual.
- When you finish, tie a large knot at the other end that fits through the loop.
This version is great for quick projects or when you don’t have a buckle on hand.
Conclusion
Now that you know how to make a paracord bracelet, it’s time to put your creativity to work. With just a few materials and some patience, you can craft a bracelet that’s both stylish and practical.
For more helpful guides and tips about paracord crafts and other recreational activities, visit Caydo. They also offer great products for knitting and crocheting, jewelry making, diamond painting, screen printing, embroidery, and more. Start exploring and enjoy making something amazing today.
Check These Products You May Shop
 |
 2-in-1 Friendship Bracelet Making Kit |
 |
FAQs About How to Make a Paracord Bracelet
How much paracord do I need to make a bracelet for beginners?
A good rule is to use about one foot of paracord for every inch of wrist size. For example, a 7-inch wrist needs around 7 feet of cord. It’s better to have a little extra than to run short while weaving. You can always trim and seal the ends when you finish.
Why do soldiers wear paracord bracelets?
Soldiers often wear paracord bracelets as a symbol of readiness and teamwork. The cord can also be unraveled and used in emergency situations. It’s both a practical tool and a sign of connection among those who serve.
What does it mean when a civilian wears a paracord bracelet?
For civilians, paracord bracelets often represent adventure, preparedness, or support for the military. Some wear them simply as stylish accessories, while others like their durability and usefulness outdoors. The meaning can vary depending on personal preference.
Should I burn the ends of paracord?
Yes, burning the ends after cutting is important to prevent fraying. Use a lighter to gently melt the ends until they form a small seal. Let them cool before touching to avoid burns. This keeps your bracelet neat and long-lasting.
What’s the easiest bracelet to make?
The easiest bracelet to make is the cobra weave. It’s simple, looks great, and is perfect for beginners. Once you learn it, you can try other patterns like the fishtail or corkscrew designs.
What is the strongest string to make bracelets?
Paracord is one of the strongest materials for bracelets, especially 550 paracord, which can hold up to 550 pounds. Other strong materials include nylon and leather cords, depending on your project. Choose based on the look and strength you want.


