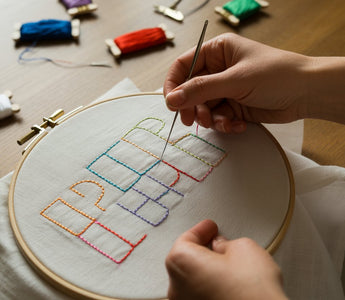
Adding embroidered letters to fabric gives your projects a personal touch that feels both creative and timeless.
Whether you want to stitch a name on a shirt, add a short phrase to a tote, or decorate a gift, you can achieve clean, beautiful lettering with just a few simple stitches.
You embroider letters by transferring your design, choosing the right stitches, and working carefully to create clear, even lines.
You don’t need fancy tools or years of experience to start. With a few materials, like embroidery floss, fabric, and a hoop, you can quickly learn how to embroider letters that look polished and expressive.
Each stitch style gives a different effect, letting you match your lettering to your project’s style. As you learn, you’ll discover how small changes in stitch type, direction, and spacing can enhance each letter’s shape.
From basic outlines to filled letterforms, you’ll find plenty of ideas and techniques to make your embroidered letters stand out while reflecting your own style.
Essential Materials for Embroidering Letters

Good materials help your stitches look clear and last longer. The right fabric, thread, tools, and transfer method make lettering neat, readable, and enjoyable to sew.
Choosing Fabric for Embroidery
Pick fabric that keeps its shape while you stitch. Cotton, linen, and a cotton‑poly blend are great choices for hand embroidery. These materials hold stitches firmly and resist puckering.
Fabrics that stretch too much, like knits, can cause uneven lettering unless you stabilize them. Use medium‑weight weaves for the best balance of firmness and flexibility. Tighter weaves help small letters hold detail, while looser ones suit larger designs.
Before stitching, wash and iron the fabric to remove sizing or wrinkles that could distort your pattern. If you plan to frame or wash your piece often, choose sturdy fabric.
Test a small area by pulling it lightly from each side to check the tension and thickness. You should feel slight resistance without stiffness. That’s your sign the fabric will support your embroidered letters well.
Selecting Embroidery Floss and Needles
Floss comes in different textures and sheens. Most crafters use six‑strand cotton embroidery floss, which you can separate into thinner strands for delicate lettering. For added shine, try silk or rayon floss, but note they can tangle more easily.
Color matters too. Light thread on dark fabric gives bold contrast, while tone‑on‑tone colors create a subtle look.
Keep your letters legible by matching the thread thickness to your fabric’s weave. Choose needles that match your floss and fabric.
A size 7 or 8 embroidery needle works for most medium fabrics. For thicker cloth, use a smaller number (with a larger eye and point).
If your fabric is fine or thin, switch to a higher number with a narrow shaft to limit holes. Store your floss neatly wound so it stays clean and untangled.
Using Embroidery Hoops
An embroidery hoop keeps your fabric flat and prevents puckering as you stitch. Hoops come in wood and plastic, typically from 4 to 10 inches wide.
Use a hoop slightly larger than your letter design, giving you room to stitch comfortably. Make sure the fabric stays taut—not overly tight—to avoid stretching.
To adjust, gently pull the edges while tightening the outer ring screw. If you plan longer sessions, wrap the inner ring with fabric tape for better grip and to protect delicate material.
Clean your hoop after use to remove residue or oils from your hands. This care extends its life and prevents marks on lighter fabrics.
Marking and Transferring Letter Designs
Clean, readable outlines make embroidery smoother. You can transfer designs by tracing, pressing, or printing them with the right tools.
Transfer paper, water‑soluble pens, and heat‑transfer pencils all give reliable results. Use transfer paper by placing the colored side down and tracing your letters with light pressure.
For darker fabrics, a chalk or white gel pen may work better. If you prefer temporary marks, draw with a water‑soluble pen and remove the lines later with a damp cloth.
Keep the traced lines light but complete. Faint lines can fade too quickly, while heavy ones may show after stitching.
Always test marking tools on a fabric scrap to check how easily they erase. This step saves your piece from unwanted stains or ghost lines later.
Best Hand Embroidery Stitches for Letters

Different embroidery stitches make your lettering look neat, readable, and creative. The type of stitch you use changes how bold, smooth, or textured your letters appear. Choosing the right one depends on your fabric, thread thickness, and the style of text you want to create.
Back Stitch for Outlining
The back stitch works well for clean, simple outlines in your embroidery lettering. It gives you strong, smooth lines that follow curves closely.
Each stitch connects right behind the last one, so your letters look crisp and even. To do it, bring the needle up through the fabric at one point, move forward a small distance, then push it back down.
Next, bring the needle back up behind that stitch and go forward again. This overlapping action makes a continuous outline with no gaps.
Use the back stitch for block letters, initials, or small text where precision matters. It’s also helpful when tracing printed outlines onto fabric because it keeps your lines tight and consistent. For best results, keep your stitches short—about 2 to 3 mm—so curves look smooth instead of jagged.
Split Stitch for Bold Lines
The split stitch creates thicker, more textured lines that stand out in embroidery letters. It works like a combination of an outline and filler stitch.
You make each new stitch by splitting the previous one with your needle, giving the line a soft, rope-like texture.
To start, bring your needle up, make a stitch forward, and bring the needle up again through the middle of that first stitch. Then repeat the motion along the letter’s outline.
The thread splits evenly if you use stranded embroidery floss, especially with 2–3 strands. This stitch makes curves and bold text look smooth and full.
It works well for script fonts or large initials that need emphasis.
Because the split stitch creates a heavier look than the backstitch, it’s great when you want your letters to stand out clearly on textured or thicker fabric.
Chain Stitch for Texture
The chain stitch adds both dimension and texture to your embroidered letters. It forms a linked chain effect, making your lines look decorative and slightly raised.
Each loop builds on the one before, creating an even pattern along the letter’s path. You start by bringing your needle up, forming a small loop, and inserting the needle back down at the same point while catching the loop to anchor it.
Continue looping your thread evenly along the traced line of your letter. This stitch works well for large, decorative fonts or monograms. Because it’s thicker, it shows best on medium to heavyweight fabrics like denim or linen.
Chain stitch lettering looks creative and polished, especially if you vary the thread color slightly for a subtle shading effect.
Stem Stitch for Flowing Script
The stem stitch is ideal for script and cursive embroidery lettering. It makes smooth, slightly twisted lines that flow naturally, similar to handwriting. The overlapping thread pattern helps curves and loops maintain a gentle, continuous motion.
To make it, bring your needle up through the fabric, then down a short distance forward along your outline. Bring it back up halfway along the previous stitch, keeping your thread always below the needle. This slight overlap gives your line its signature twisted look.
Stem stitch lines have a medium thickness and a soft sheen, especially when stitched with stranded cotton or silk thread. Use consistent tension and short stitches to avoid uneven spacing on tight curves. This stitch works perfectly for words written in cursive, giving your text a graceful and hand-drawn feel.
Also read: Types of Embroidery Stitches: 15 Must-Know Basics & Beyond
Advanced Techniques to Fill and Enhance Letters
You can give your embroidered letters more depth, texture, and polish by choosing stitches that create solid fills, smooth gradients, or small raised details.
Using the right filler stitches helps each letter stand out clearly and look consistent across your design.
Satin Stitch for Solid Fills
The satin stitch creates a smooth, shiny surface that works well for block or bold fonts. You form it by laying long, close stitches side by side, spanning the width of each section of the letter. Keep your thread tension even so the stitches lie flat and the edges stay crisp.
To plan your work, outline the letter shape first using a split stitch or backstitch. This gives the satin stitches a frame to rest against.
For wide areas, divide the section with small anchor lines to keep the fill neat and avoid gaps. You can adjust the satin stitch direction to follow the natural flow of letter curves. This technique adds a subtle sheen variation that catches light differently.
Many crafters use two threads in the needle to boost coverage and prevent thin spots.
|
Tip |
Why It Helps |
|
Always start in the center and work outward |
Keeps your stitches more balanced |
|
Use a smaller needle for narrow lines |
Improves accuracy and prevents snagging |
|
Blend two close shades of floss |
Adds depth without changing stitch type |
Long and Short Stitch for Gradient Effects
Use the long and short stitch to create shading and soft color transitions inside your letters. It works best for script or large fonts with wider spaces where you can blend two or more thread colors.
Begin with one row of alternating long and short stitches along the letter edge. On the next row, mix the lengths again so the ends overlap slightly. This overlap softens the boundary and makes the gradient look smooth.
When switching colors, fade one shade gradually into the next instead of making a hard line. It is helpful to thread two needles—one for each color—so you can move between them easily.
A light hand with tension keeps the surface even. Pulling too tight may cause puckering or break the blend. Practicing on scrap fabric before working on your final piece helps you find the right density and thread flow.
French Knots for Decorative Touches
French knots bring small, raised dots of texture that enhance letters with playful or elegant details. You can use them as accent points on cursive ends, along guidelines, or inside large areas as filler stitches.
To make one, bring your needle up through the fabric, wrap the thread twice around the needle, and then reinsert it very close to where it came up.
Hold the thread taut as you pull the needle through so the knot forms neatly on the surface.
You can space French knots evenly for a dotted effect, or cluster them for a beaded look. A thicker thread or extra wrap adds height and texture, while one wrap gives a finer dot.
Try outlining a letter with small knots to draw attention without covering the fabric. Mixing satin or long and short stitches with knots gives your embroidery a layered appearance that feels both tactile and refined.
Also read: Best Fabric for Embroidery: How to Choose the Right Material
Design Tips and Creative Ideas for Embroidery Lettering

When you plan letter embroidery, focus on how your font style, stitch direction, and finishing habits work together. A design that’s well-planned from the start makes your lettering more polished and easier to stitch by hand.
Selecting Fonts and Patterns
Choose fonts that match your project’s style and your embroidery skill level. Simple block or sans-serif fonts are beginner-friendly and easy to outline.
If you prefer a softer, more decorative touch, try script or cursive fonts. Keep the spacing wide enough so the threads don’t overlap.
You can find many embroidery patterns for letters online or sketch your own using a washable fabric pen. To transfer the pattern, trace it through light fabric, use carbon transfer paper, or print directly onto stabilizer sheets.
Always test the scale first. Letters smaller than ½ inch are harder to stitch neatly.
|
Font Type |
Best For |
Notes |
|
Block |
Thick fabrics, bold designs |
Easy to trace and fill |
|
Script |
Decorative items |
Works best with thin threads |
|
Serif |
Monograms, formal pieces |
Ideal for satin stitches |
Matching thread color to your background fabric also affects readability. Light threads on dark cloth or vice versa make each letter stand out clearly.
Planning Stitch Direction
The way you plan your stitch direction controls how your letters look and how long they last. Use straight stitch lines for upright, block letters.
For curves or slanted letters, follow the letter’s flow rather than stitching in random directions. Try combining stitches like backstitch, split stitch, or running stitch to add texture.
A running stitch gives a soft outline, while chain stitch builds a bolder look. When filling letters, angle stitches consistently so they reflect light evenly.
Sketching arrows on your pattern helps plan direction before you start. This saves time later and keeps your stitches aligned.
Smooth, even stitching will help your design hold its shape through washing and wear.
Practical Tips for Neat Results
Work from the center of the fabric to the outer edges to prevent distortion. Keep the fabric slightly taut in the hoop but not overstretched, or your stitches may pucker.
Trim thread tails short on the back and secure them with tiny knots or by weaving them under previous stitches. This reduces bulk and keeps the underside flat.
When you embroider letters by hand, consistency matters—maintain even tension and stitch length. If you make mistakes, don’t pull too hard to fix them.
Instead, carefully snip the thread and restitch that section. Finally, press your piece gently face down on a soft towel to avoid flattening the texture of your embroidery patterns.
Wrap Up
Embroidering letters adds a personalized touch to any project, from clothing to gifts. Start by choosing a clear font and transferring the design onto fabric using tracing or transfer paper.
Use stitches like backstitch, satin stitch, or split stitch for clean, readable letters. Practice spacing and consistency to achieve professional results. Whether hand or machine embroidery, lettering enhances your creations with meaningful details.
Explore Caydo embroidery kits and start personalizing your embroidery projects today!
Also read: How to Tie Off Embroidery: Easy Start & Finish Guide
Frequently Asked Questions
What are the best stitches to use for embroidering text on fabric?
Try back stitch, split stitch, or stem stitch for clear, smooth lines. These stitches give you control over curves and corners and keep letters looking even.
Satin stitch works well for filling thick letters or bold fonts.
Can you offer tips for keeping lettering even and straight while embroidering?
Use a fabric-marking pen or water-soluble pencil to draw light guide lines before you stitch. Secure your fabric tightly in a hoop to prevent shifting. Keeping your tension steady also helps lines stay straight and spacing consistent.
How do I choose the right needle and thread for embroidering different font sizes?
For small text, use a fine embroidery needle, such as size 9 or 10, with one or two strands of floss. Larger letters can handle thicker thread and a slightly bigger needle, like size 7. Match the thread type to your fabric—cotton floss for most fabrics and silk or rayon for a softer sheen.
Is there a trick to transferring intricate letter designs onto materials before stitching?
You can trace your design using a light box, window, or iron-on transfer pen. For dark or thick fabrics, use white or chalk transfer paper to keep lines visible. Make sure the design is centered and secure before you start stitching.
Could you suggest ways to add embellishments to embroidered letters to make them pop?
Add small French knots, metallic threads, or seed beads for texture and shine. You can also outline letters with a contrasting stitch or color to make them stand out more. Just remember to keep additions balanced so they don’t crowd the text.
What's the most effective method for securing the ends of thread when finishing up embroidered lettering?
Run the thread under several stitches on the back side of your work.
Then trim the tail close. Avoid tight knots that could show through or distort the fabric. If you’re working with delicate materials, use a small dab of fabric glue for extra hold.


